


Shippers
-
Content Count
111 -
Joined
-
Last visited
-
Days Won
2
Reputation Activity
-

 Shippers got a reaction from sxocpaul in Everything for Sale
Hi, thanks for the message. Your probably familiar with the exhaust but I've put a link to which one it is below. I got it last year and did less than 2,000 miles with it on before selling the car. I wanted a stock look so had the standard exhaust tips on it which went back on the original when sold. You can either use the standard tips from your exhaust or ask H&S to sell you pretty much any type you like.
https://www.haywardandscott.com/toyota-gt86/toyota-gt86-with-helmholtz-chambered-rear-silencers-and-silenced-centre-pipe.html
-
 Shippers got a reaction from kaisersalsek in Everything for Sale
Hi,
They are:
Rays Gramlights 57Xtreeme Rev Limit Edition 18x8.5 ET41 5x100
I got them in 2020 costing £1,590 + tyres which are PS4's + Rays wheel nuts.
Hope that helps 👍
-
Shippers reacted to Ignited in Manual or Automatic transmission??
I agree with driving them both to see what you think. I also agree with having a difference between the fun car and the daily. This is one of the reasons why I bought the auto. I also agree that the auto is hard to get off the line very quickly but think it is great when you want to get away reasonably quickly as it just adds speed very smoothly. The overtaking in the auto is great although there is a small delay while it works out what gear it can drop to. After a while though you factor this in with your driving style.
I have the Tuning developments NA package with their super resonated exhaust and 4.67 final drive now and it is quick.
I prefer to drive in auto mode but using the paddles to over ride the box when needed and I think this is better than pure manual mode for making progress.
If it was my only fun car though I think it would be hard not to go for a manual.
Which brings us back to driving both and seeing what you think will work for you!
-
Shippers reacted to spikyone in In comes the GR86
It's not different enough for me, and I'm with @Varelco that the design is less attractive than the current car.
I do wonder who will buy it. If you didn't buy into the ethos of the original GT86, are you going to be interested in this? And if you did buy into it, are you going to upgrade to what's essentially a major facelift? It'll be a hard sell.
Different as they are, I don't think I'd walk past a GR Yaris for the GR86.
-
-
Shippers reacted to Neil-h in Superchargers and fuel consumption, any views?
Sure the Harrop kit isn’t cheap but you can see where all the money goes in the quality of the engineering. I fitted mine myself and the ease it goes together shows just how much work Harrop put in during the design process. Then you’ve got the way it looks, as others have said already you honestly wouldn’t know it was after market.
Going back to the OP, I’m getting around 33mpg on a gentle commute and down to 29 or so if making progress.
-
 Shippers got a reaction from barberjay in Pearl white TRD daily
Congrats on the new car. Nice choice on the TRD. Look forward to seeing what you do with it
-
Shippers reacted to MartinT in MartinT's BRZ
The Bilstein B8 dampers were installed today, to accompany my existing H&R Super Sport springs. If you wanted to do the whole shebang, you could buy the Bilstein B12 kit, which consists of B8s with Eibach lowering springs. At the same time, lower arm Superpro poly bushes front and rear were installed, as well as Superpro lower control arms, adjustable toe controls and Whiteline anti-roll bar drop links front and rear. It also got a full laser alignment. By the way, I ordered the Bilsteins last October and they only just arrived this week. Be prepared for a long wait.
Abbey did the usual superb job and threw two technicians at it, so it was all completed by early afternoon.
Ride quality is firm but fluid. You certainly know that you're no longer on stock dampers, but at the same time it remains supple and always in control. There is no bounce, especially over large undulations. There is certainly no crashing or harshness. It's just firm. But that leads to...
Roadholding. Goodness me, this is different! In the damp conditions driving home, and off motorway as much as I could, the level of grip and control around bends and coming off corners and roundabouts is on a different planet. Being able to put down a goodly amount of supercharger power and not have it scrabbling for grip is amazing. No, I didn't sneak a set of 255s on the wheels, they're still 235 PS4s. However, I am not used to being able to give it so much pedal so early coming off a corner. It really is a new kind of fun.
Was it worth it? I think so, as the investment in a good boosted setup is wasted if you don't pay as much attention to the chassis, and stopping, as it needs.
-
 Shippers reacted to Kaltorak in US vs UK prices.
The handling fee is for them taking the time out of their busy day to charge you all the other bits!
-
 Shippers reacted to gavin_t in Reyland brake kit
Carbontec AX6 was what he was recommending.
I might stick to my guns and go with PFC 08 as there are many happy people using them
-
Shippers reacted to MartinT in Reyland brake kit
I have found PFC Z rated really good for road use.
Sent from my LG-G7 using Tapatalk
-
Shippers reacted to rob275 in How do we report a user
That ship sailed when the other forum was sold on to be fair. We did want a merge, it's now impossible without selling this to the same company (which is american). We kept the forum here owned by enthusiasts and always intend it to be in the future if it exists because that way there's a vested interest and it won't get clogged up with shitty sponsored adds for dildos etc.
-
Shippers reacted to Neil-h in Harrop self fit supercharger kit review
Hi All,
Back at the start of the lockdown I decided I needed a project to look forward to whilst working from home and I'd been toying with the idea fitting a turbo/supercharger for a while. Only problem was a i really fancied doing the installation work myself, so after some research (and a test drive in the Abbey demo car) I settled on ordering the Harrop supercharger kit from @Mark@Abbey M/S . Now it turns out that Abbey don't sell many of these kits for DIY fitment, so i figured I'd write up a bit of a review in the hope others might find it useful and may even have a go themselves in the future.
Existing mods
Prior to fitting the supercharger I'd had a TD manifold fitted and a remap by Abbey which took the car up to about 180bhp at the hubs and around 140ibft of torque. I’ve also fitted several cat backs ultimately settling on the TD super res.
What's included?
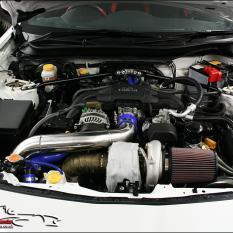
So for the money you get Harrops custom built manifold mated to an Eaton TVS1320 blower plus all the bits and pieces required to make it work on the car (including a special tool for reforming the A/C pipe around the supercharger). I have to say on unboxing the kit i was really quite impressed, it includes just about everything you need to get the job done. Complete with a signed off opy of the picking sheet when the kit was put together at Harrop so you can see someone's taken the time to put it all together and you can easily check it's all there. The only bit that wasn't included was the coolant for the charge cooler but that's not the end of the world as it's a standard GM coolant so you can get the anywhere.
In addition Mark also provided; the loan of an EcuTEK programming cable and dongle, a base map to get the car running, distance mapping (more on that later) and a session on the dyno for final map tuning and a power run.
The fitting process
This is the bit i'd imagine will be most of interest to other as there's not an awful lot of info online about it. Now the first thing I must stress is much in the style of the Pirates code (see one of the Pirates of the Caribean films for the full reference), the instructions are really for guidance only. They'll point you in the right direction (usually getting you 95% of the way there) but there will be times where a little bit of thinking is required. Most of those moments centred more around the removal of the OEM items rather than the refitting of the new bits, which in all honest I kinda expected and it wasn't really that difficult. That being said Mark was always at the end of phone when I had bits i wasn't sure of.
In terms of what was required to fit the kit, i did it over the course of a week with the front end in the air on a set of drive on ramps. If you're going to this way it's worth considering fitting the chargecooler/chargecooler pump/pipe work first (the instructions have it last). That way all the work from underneath is done before you start removing things like the fuel rails. Also it's worth following a bit of advice from one of the American forums and remove the undertray all the way back to the footwell, it's sods law you'll drop something and it will almost certainly land on that under tray.
As for tools, the only specialist tools required were the former for bending the A/C pipe out of the way and that was included in the kit (it's worth making sure you have a substantial G clamp though as bending that pipe is hard work). Just about everything else can be done using a socket set and the odd screwdriver/allan key.
The only minor issue i did find was that clearance between the TD manifold and the crank pulley was a bit tight, so we had to grind a little bit off the flange to fit the auxilliary belt. That and getting the fusebox apart to fit the chargecooler pump wiring but that's simply a case of trusting that it's more solid than you think. Once you're happy leavering things knowing what you can get away it comes apart fairly easily.
Mapping
Now the mapping process is something I've never really been involved in before so it was quite interesting. So Mark talked me through the initial process of connecting the EcuTEK software to the car and querying the ECU. He then sent over a base map which allowed me to get the car running and. From there it was a case of going out taking data logs starting keeping the car at low load/rpm initially then gradually increasing load/rpm as Mark tweaked the mapping till we got to a point where i could run it all through the rev range. This was the first point where the supercharger relay began to put a smile on my face, running it all the way through the rev range in third is really quite addictive. The way the torque just builds and builds is fantastic. After that i got the car booked in on the dyno for the final tune and a power run (the results of which are attached), the headline figures being approximately 240bhp (up 60bhp) and 200ibft or torque (also up around 60ibft).
Conclusions
to wrap up, i have to say i don't regret going down the DIY fitment route and i'd highly reccomend it to anyone that's half decent with a set of spanners. Fitting this kit really isn't all that complicated and the feeling of pride when you fire it up for the first time is just fantastic. That and of course you get a car at the end of it with some serious performance, the bit where it really comes alive is the the way it pulls through third/fourth/fifth. Where it used to run out of steam the car now just pulls like a train. With the added bonus that the fuel consumption hasn't taken to much of a hit, granted if you really press on then it drops quite quickly but on a gentle cruise i can still get 32-33mpg.
I'd also just like to say a big thanks to Mark and the team at Abbey Motorsport. They were really helpful through out the process (Mark even delivered the kit personally after Parcel Force decided it was to heavy but didn't bother calling him to say so) and it was good to know that Mark was at the end of the phone should i need some advice.
If anyone has any questions then fire away, i'm more than happy to help.
-
Shippers reacted to gavin_t in Daily driven/ track day brake pads
On the fluid and lines front I am stock. I do change the fluid every year though as keeping it fresh is as key as it been decent fluid,
I have used ATE blue in the past and found it good. Can get it from euro car parts too so nice and easy to get
-
Shippers reacted to willclarke in Daily driven/ track day brake pads
Yes rbf660, worth it as I was boiling fluid before (even ate200), and braided lines, although I'm not sure how much difference the lines actually made and I'm sure I read somewhere the oem lines are actually pretty decent anyway
Sent from my Pixel 4 using Tapatalk
-
Shippers reacted to Deacon in Daily driven/ track day brake pads
Pre BBK I had lines and used ATE Blue fluid.
Post BBK it's lines and RBF660 fluid.
-
Shippers reacted to sam534 in Daily driven/ track day brake pads
I use rbf600 as its simple and easy and to have the piece of mind that your fluid won't boil on track is worth the couple of extra quid cost on fluid and to do a yearly change.
I haven't don't lines yet.
Sent from my COL-L29 using Tapatalk
-
Shippers reacted to cliddell in Mtec clutch spring
I also got mine from TD.
You definitely have to take the pedal assembly off (right hand drive!), but it's not nearly as scary as it sounds.
It took me about two hours, including a short break for rain, a short break for coffee, and accidentally pulling out the wrong spring clip. I removed the clip for the brake pedal, then wondered why the clutch wouldn't move.
This guide is pretty good:
how to install MTEC clutch spring upgrade in right hand drive BRZ GT86 86 FRS
The only thing I would add is that, if you can, get a second pair of hands to help line up the clutch pedal assembly with the bulkhead holes when refitting. That was the one bit of the process that really gave me a headache - damned thing kept slipping.
-
 Shippers got a reaction from Jay Bamrah in Mtec clutch spring
I got it from Mike at TD. Not fitted it yet so would be interested to hear your feedback if you get round to fitting it before me.
-
Shippers reacted to Samwise in Bringing an 86 back from the dead
Need to preface this latest update by apologising for the lack of Pictures!
I've been so busy I totally forgot to snap away some pics while i've been working on things!
Anyway with that said I have been starting some work on the LS3 which is of course rather exciting. With money the main factor in really moving along with engine related work I wanted to start off by doing a few bits that are free, namely cleaning up the grubby exterior of the engine and starting to disassemble it. Cleaning it up is no rocket science, being that I am planning to strip the engine down in almost it's entirety I decided to go at it in a rather blunt way with simple some oven cleaner and pressure washer. Being that the block and heads are Aluminium there's no real risk of them rusting externally but I largely wanted to get off any oily or loose grime hanging on so I can later paint the block before it gets anywhere near my car and in the process I found a rather alarming issue.. it wouldn't turn over by hand anymore!
That brings me on to the first of my latest videos:
Now going on from here I went back the next week to obviously work out what on earth was causing the engine to seize at that point in the crank rotation. I wasn't really worried about the engine being totally seized as I've been periodically turning it over and spraying fogging oil in to it to keep everything nice and lubricated but clearly something was causing it to jam up.. Time to tear it down! So that Weekend with the help of my Dad who's been itching to tear in to the engine with me we stripped the heads off the block and found the engine to generally be in a pretty sludgy oily state, it's by no means bad condition simply used and likely without too many frequent oil changes. The oil that was left in the engine has clearly been in there for a while, probably through a few heat cycles, etc etc. If anyone's an Oily science person (technical term) i'm sure they can give their 2 cents as to what they think All that aside however simply taking the heads off the block and lightly wiping off any excess sludge and oil from the top of the pistons didn't free up the engine, so next we whipped off the front timing cover and found nothing particularly stuck or otherwise in the timing change, etc. However when we took off the oil pump.. eureka! the engine was freed up again and could turn over as many times as we wanted, nice and smoothly too i might add! Upon taking the oil pump apart it seems the gears inside were not dry by any means but simple got stuck together or perhaps sliped/jumped a tooth etc, not an issue i'm aware is quite common but perhaps where i've been turning the engine over by hand all this time with no oil in the pump these things happen, it's not the end of the world however as I was always planning to replace it regardless and that gets me on to my plans for the engine... Now plans wise I want to give the engine what I would consider a pretty standard rebuild. I'm not going to be attacking the bores with a bore gauge or the crank journals with a micrometer and subsequently re-boring or grinding them if they don't need it. I will however be checking the head's aren't warped, checking the bearing tolerances (with plastigage albeit, i'm not made of money for the big boy tools!) and re-honing the bores of the block. From my initial inspection everything is worn very well and there are no alarming amounts of scoring that would indicate anything to worry about, everything generally looks in tip top shape just oily.. stained, etc! So with that said here's the list of things i'm planning to do to it: - New Rod bearings (will check clearances with plastigage, don't really have funds for big boy tools)
- New Piston Rings (Will gap accordingly)
- Hone Piston Bores
- Connecting rod ARP Bolts
- Leaving Crank & Main caps in place, not removing (this might change, i've had a change of heart and will research further)
- New Lifters & Lifter Trays
- New Gaskets and Seals throughout ( Everything from head gaskets, sump, valley cover, front & rear cover, etc)
- Cam Swap + 3 bolt 58 tooth x4 Cam gear
- New Cam Retainer Plate
- LS2 timing chain guide + new chain
- New timing cover /w front main seal + cam sensor
- New Rear cover /w rear main seal
- Rear Oil barbell
- Hardened Pushrods
- Rocker Arm Trunnion bearing upgrade
- New Valve Springs
- Clean, reuse & re-lap old valves to head
- New GM Performance Oil pump + Pickup brace
- New LS3 Intake Manifold /w Attachments
- ATI superdamper (no pulley on engine when purchased)
- New front accessories (none with engine currently)
I've posted this to a couple of LS Swap groups and had some pretty good responses and no one jumping at the chance to flame me for being a fool (atleast not in regards to the LS!) so i'm pretty confident that this is a fairly sensible direction to head in. Of course without going the full lenghts of re-boring, crank grinding, measuring with proper tools etc the engine is never going to become some kind of monster race engine but I simply don't have the money, time, etc to do those things nor to be able to pay someone to build the engine for me. These engines are fairly robust ofcourse and as long as don't do anything silly like fit the wrong bearings or try and fit round pistons in oval bores I feel i should be fairly safe.
And with that all said it gets me on to my next couple of things... firstly I will ofcourse be utterly soaking this engine top to bottom in degreaser and going over as best I can to clean out any water, oil passages etc. Heck i even bought a little Bench mounted parts washer which is exciting and 25L of degreaser concentrate, so that'll probably last me a lifetime! and further to all that i've already ordered a couple of part that have arrived!
What you'll see below is a Texas Speed LS3 Stage 3 NA cam (look it up for the specs or check out my video!) which i'd be pretty conservative in saying should give an additional 50hp to the engine along with their .660 lift dual valve spring kit, hardened push rods, CHE Trunnion bearing replacement (a weak point of LS engines) and the new oem GM high performance oil pump!
and the following video to tie it all together!
-
Shippers reacted to Varelco in I live in London where’s the best place to get supercharged
That's not entirely true.... I shall explain.
Had a little convo with Matt@Cosworth recently and he told me they do have supercharger kits, but they are missing the Eaton blowers themselves. Now if there was a group buy he said that it might enough to convince his boss to buy some superchargers to make up and sell some kits...
Food for thought for those on the fence.
-
Shippers reacted to Lauren in GR Yaris who's going for it?
News in, from Richard. Mine should be arriving at RRG Macc today. Arranged Saturday pick up.
-
 Shippers got a reaction from choupolo in New member - planning mods and trying TSS
Yes, I went EL with the springs as well. With the springs in, the gear stick goes back to centre (neutral) with a bit more force. Less 'slack' i guess I would call it. As others have said, it is hard to describe but going into gear has a more positive feel is best way to explain it. Let us know what you think when they are in.
-
 Shippers got a reaction from Tweedbean in Interior Light Bulb
Yes, I found them good. Bright White and no tinge. I actually find the vanity mirror ones perhaps too bright! They are easy to swap and cheap so I figured it was worth giving them a go. No issues to report having had them in for about a year now.
-
 Shippers got a reaction from Mike@TD.co.uk in Black Friday 2020 from Tuning Developments
Yes, MTEC springs are well worth it. As above, it doesn't get rid of the slight stiffness from 1st to 2nd when cold but I'm fairly sure I've seen others recommend uprated gearbox oil to help with that. What it does do is make gear changes even more positive and gives a better (in my opinion) feel to shifts.
@Mike, email on its way to you for a super res exhaust for me this year please 😁