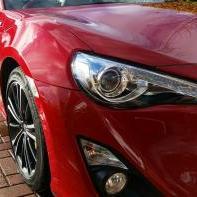
Knighty 29 Report post Posted February 27, 2017 Hi guys, After being a part of this forum for over 12 months and seeing all of the amazing cars you guys have built, gaining knowledge and inspiration along the way. I feel it's time I should start a record of my progress on my own car. I've held back until now, simply because I felt my progress would be too slow and would not do the rest of the builds on the forum justice. There really are some amazing examples on here. I hope you all enjoy the read! Knighty's 86 Build Thread It all started in January 2016 when I found the 86 at a local car supermarket, it was a 64 plate, with 5000 miles on the clock, after looking on the market for an 86 for some time I realised this car was offered at a great price for the spec, Ideally I was first looking for a white or dare I say it, ginger model . But I love red cars and when I saw it I just had to have it, a deposit was placed, I test drove it a week later, and picked it up the following day, sadly leaving behind my beautiful 7th generation Celica GT. It only took a few weeks before I added my first modification, which was much needed in my opinion... Toyota OEM armrest. Having somewhere to put your arm that isn't in the cupholder improved things no end! Also added an 86 plaque for the heated seat switch surround. Next up, not really a modification, I applied my personal plate to the car, and bought some 3D gel resin number plates from Demonplates. these number plates are really nice quality, with the lettering mounted onto the plate, rather than part of the reflective backing. Carbon fibre is one of my favourite materials to look at, and I soon found that a whole host of interior trim pieces were available to give a nice premium look. I started with the steering wheel piece. I then added the door handle trims There's still a lot of carbon trim left to buy, but hopefully I'll get round to it at some point! The car stayed like this for a few months before I treated myself for my birthday to something I'd been wanting for a while. Cobra Sport resonated exhaust. The sound of this still makes me smile even now, wakes the car up so much! just what was needed! Around the same time I treated the car to its first proper detail... This consisted of; Snow Foam Shampoo wash Clay Bar Machine Polish (Light polish) Paint Sealant Wax Below are some of the after shots After this the car was just enjoyed for the rest of the year, I took it out on drives through the peak district, snake pass and so on; The day at snake pass was absolutely awesome! Gorgeous sunshine, open road, the 86 and just me, myself and I. I feel like a club outing into the peaks could be an amazing idea, however it does tend to get very busy with cyclists and the like, so might not be suitable! Next day out was a trip to Blyton with the club. The first time I got to meet many of you! Many thanks for the warm welcome and making me feel at home! Got some awesome passenger laps with you all! Then finally onto JAE, my first year at the show and had such a great time! Again thankyou to everyone who made me feel welcome! Before JAE I was undecided on what to do with the 86. I wanted to lower it, but was unsure of the best way to go about it. At first I thought springs would be the way to go, but after a bit of research and talking to other members. I decided that springs wouldn't give me what I was looking for, and so I turned to the trusted brand TEIN. I ordered a set of TEIN Flex A coilovers with Amber Performance, and after a long wait, they arrived for me at work! I then had to decide on what camber adjustment I'd like for the rear of the car, again the wealth of information on the forum saved me, and I opted to go for a set of summit/Swave rear arms. Really nice quality and a great price again from Amber performance. I had a set of 17 x 8.5 Japan Racing JR3 alloys wrapped in Toyo T1R tyres left over from the Celica build and decided to make use of them, installing them on a stock height car I was a little unsure. Before After I ended up really liking them on the car after a while and thought the machined look, really hit a nice contrast with the paint. They looked a little small in the arches, but I decided to see how they looked when the arch gap was removed. Finally after a few months, the faithful day arrived on Friday the 24th February. The car was booked in with Mike at Tuning Developments to have both the coilovers and rear arms installed, along with a fast road alignment. To say I was looking forward to it was an understatement. When I picked the car up. I wasn't disappointed. This is how the car currently sits This has just transformed the car. You don't truly appreciate just how high the 86 sits on stock suspension until you see it lowered. I absolutely love it, and the wheels look so much better now the arch gap has been removed. The intention was always to purchase a new set of wheels for the car, but I'm quite happy to keep these on for a while. So far I'm extremely impressed with how good the ride quality is on the TEIN suspension. I currently have it set to full stiff all round, but I'll start to make some adjustments soon. The car also feels so much more responsive with the alignment setup. And so this brings me up to the point the car is currently at. To everyone that helped and gave me advice up to this point a huge thankyou is in order. I appreciate everyones help! Hopefully I can keep making steady progress with this thread as time goes on. There is still a lot of things I have in mind for it! Until next time! 5 DanJ, tegunulgener, TTR and 2 others reacted to this Share this post Link to post Share on other sites
Paul 442 Report post Posted February 27, 2017 Glad to be of (some little) assistance. Car looks great. Will we be seeing it at the TD Open Day in April? 1 Knighty reacted to this Share this post Link to post Share on other sites
Lauren 2259 Report post Posted February 28, 2017 Good work and looking good. We did a run out round the Peak District last summer, I suspect there will likely be another, keep an eye out on social meets. 1 Knighty reacted to this Share this post Link to post Share on other sites
Knighty 29 Report post Posted February 28, 2017 Glad to be of (some little) assistance. Car looks great. Will we be seeing it at the TD Open Day in April? Thanks! I'm hoping to make it across Paul, I'm owed a drive of the TD86 😎. All being well, I'll be there! Sent from my ONEPLUS A3003 using Tapatalk Share this post Link to post Share on other sites
Knighty 29 Report post Posted February 28, 2017 Good work and looking good. We did a run out round the Peak District last summer, I suspect there will likely be another, keep an eye out on social meets. Thanks Lauren, that's great I'll be sure to keep my eye out! Appreciate all the advice you gave on the suspension! Sent from my ONEPLUS A3003 using Tapatalk Share this post Link to post Share on other sites
Keethos 842 Report post Posted March 5, 2017 Nice right up dude and glad it's all going to plan! Be good to catch up again soon dude! Any ideas on what's next? 1 Knighty reacted to this Share this post Link to post Share on other sites
Knighty 29 Report post Posted March 6, 2017 Nice right up dude and glad it's all going to plan! Be good to catch up again soon dude! Any ideas on what's next? Cheers Keith. Definitely would be good to catch up! I haven't really thought past this point to be honest. A new set of wheels would be nice but I think I'll focus on some smaller aesthetic bits for the next few months. I think I'll look to get the roof wrapped black next, and perhaps a few more carbon bits for the interior! Would like a different spoiler too but still not decided what I want to go for. Sent from my ONEPLUS A3003 using Tapatalk 1 Keethos reacted to this Share this post Link to post Share on other sites