

TRDness
-
Content Count
48 -
Joined
-
Last visited
Everything posted by TRDness
-
Spoiler for sale - standard GT86 Pearl White 37J
TRDness replied to TRDness's topic in For Sale GT86 / BRZ Parts
Hi mate, yes it is, are you able to collect it from me in Crawley? Cheers -
Spoiler for sale - standard GT86 Pearl White 37J
TRDness posted a topic in For Sale GT86 / BRZ Parts
Hi all, Here I have a standard pearl white 37J spoiler for sale, comes with all original bolts and fixings so is ready to be bolted straight on easily. Not a single scratch on it, it's in perfect condition! Asking for £80. It must be collected from myself in Crawley, West Sussex (i will deliver if you are within a half an hour radius) Pics to come below: -
Hi all, I've got a JDM set of TOM's red tail lights on the way over from japanparts.com. They are significantly cheaper ordering from there compared to getting them here in the UK (even with customs charges). Does anyone have any experience with the wiring of these? Will they plug and play directly with our EU tail light wiring or will I have to do some re-pinning to get them to work? They are E-marked however, no idea if that means they'll be compatable with european models. Should be a question asked before buying but there we go! Haha. Thanks, Ajay
-
Turns out I've been shafted into working on the 12th, sorry man
-
Yeah I think that's the one they said they couldn't sell to anyone, with the dodgy engine? [emoji6] Nice purchase man [emoji106]
-
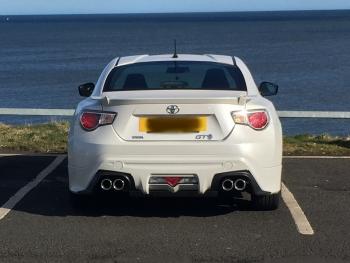
Hi everyone. I’ve decided to make a build thread of my 2013 GT86 TRD edition, a lot of work has already been done to it so I thought I’d share its progress so far. The GT86 TRD is a special edition in the UK and 250 were made for the country, it comes with the Japanese TRD body kit, TRD TF6 wheels, and a variety of other TRD upgrades. I have built the car to be TRD themed visually but it also has a lot of other quality aftermarket parts where you can’t see! I’m based in the UK where car modification to this type of car is less popular than in the USA due to insurance costs and the general fact that parts are more expensive to source due to tax, but that doesn’t put me off! I have spent the last year modifying the car in preparation for track use and forced induction, and it is nearly complete. The next thing on the list for this car is to be HKS V2 supercharged. Now I’ve been through a lot of ups and downs with this and the whole turbo vs supercharger thing, and also which type of supercharger to go for. I chose the HKS centrifugal supercharger for a variety of reasons, reliability and simplicity being the top factor as my car is my daily driver and the last thing I want is a blown rod on the way to work. Centrifugals don’t make a lot of boost down low in the RPM range, which is when the rods are vulnerable, and I don’t want the mechanical complexities that come with turbo’s, so centrifugal is the way for me. I am very aware of its pros and cons compared to other methods of forced induction. My target is 300whp on 99 octane (93/94 for Americans) and I’ll also look into the prospect of forging the engine, changing the fuel pump and injectors and taking it up to 400whp in the future, which is about the limit of what the HKS supercharger can do. Factory features in addition to the regular GT86 UK Spec: TRD Quad Exhaust and Diffuser TRD Rear Bumper TRD Side Skirts TRD Front Splitter TRD Fuel Cap TRD Shift Knob TRD Radiator Cap TRD TF6 Styling Wheels 18X7.5 +46 Yokohama Advan Sport V105 Tyres 225/40/18 Current Mods: Wheels: Yokohama Advan GT Forged 18X9.5 + 40 in Machining Hyper Black all around Yokohama Advan Sport V105 Tyres 255/35/18 all around Camber, Caster and Toe Specs: -2 Degrees Front, 0 Toe. -1.5 Degrees Rear, 0 Toe. Factory Caster Suspension and Chassis: TRD 40-Way Damping Adjustable Coilovers with Optional Racing Springs, Bump Stops and Pillow-ball Camber-Adjustable Top Mounts. Spring Rates – Front: 49.5 N/mm, Rear: 72 N/mm TRD Front Strut Brace Cusco Rear Carbon Fibre Strut Brace Summit S-Wave Rear Lower Adjustable Camber Control Arms TRD Transmission Mount TRD Differential Mounts LH and RH Braking: TRD Monoblock Brake Kit (Produced by Brembo) – 6 Piston Front with 355mm Slotted Rotors, 4 Piston Rear with 345mm Slotted Rotors TRD Brake Lines Brembo Racing Brake Pads Motul RBF 600 Dot 4 Performance Racing Brake Fluid Engine, Transmission and Exhaust: HKS Version 2 Supercharger 41mm Restrictor AVO Oil Cooler Charge Air Temperature Sensor ACS Xtreme HD Stage 1 Organic Clutch Motul Gear 300 75W-90 Synthetic Racing Gear and Differential Oil HKS Super Hybrid Drop-In Air Filter TRD Sports Oil Filter TRD Oil Filler Cap TRD Radiator Cap TRD Fuel Cap TRD Engine Mounts LH and RH HKS Equal Length 4-2-1 Exhaust Manifold (Header) Milltek Overpipe TRD Quad Exhaust with TRD rear Diffuser Berk Front Pipe with 200-cell High Flow Cat RaceSeng Cam Plate Fensport Lightweight Crankshaft Pulley – Harmonically Balanced Outer Body: TRD Rear Trunk Spoiler and Side Spoilers TRD Side Skirts TRD Rear Bumper TRD Front Splitter TRD Shark Fin Aerial TRD Fender Extensions TRD Chrome Rear Badge LED Licence Plate Lights TOM’S Red Tail Lights Valenti Red Rear Bumper Light Import Licence Plate with Custom Registration Interior: TRD Gauges – Oil Pressure, Oil Temperature, Water Temperature Blitz Racing Meter Panel Black P3 Cars Vent-Mounted Multi Gauge TRD Momo Steering Wheel OEM Toyota Arm Rest TRD Push-Start Button TRD Shift Knob Carbon Fibre Wrapped Interior Panels LED Dome Light Dealer fixed the following under warranty: Leaking Noisy Window Seals – replaced seals and adjusted windows Poor Battery Life – upgraded from 30ah battery to new more powerful 45ah battery Locking Wheel Nut Key Sheared – removed and replaced locking wheel nuts and refurbished TRD wheels damaged in process Poor down-shift into 2nd gear when car is cold – replaced and adjusted shift plate Any questions/comments? Post below! I'm happy to help with technical questions on the parts I've used.
-
Perhaps it's the difference in brake kits, I do get a lot of feedback with my braided lines so maybe that's allowing me to feel it more.
-
I'm up for this subject to having the day off! Will let you know on the 17th.
-
A small addition to the car with a big impact! I've just installed a Laile Beatrush master cylinder stopper on my car, and for £23 it's one of the best bang for your buck mods you can do to this platform. The only downside is that you have to import it from japan, so postage is likely to cost about the same as the product itself. Why Install this Cheapo Part? The 86/BRZ/FRS has a thin firewall (most probably to save weight and production cost), therefore when you press the brake pedal hard the firewall tends to flex noticeably and you can sometimes feel that you're not getting much more braking with the effort coming from your foot, making the brakes feel sloppy and less effective. The brakes feel normal until about half braking pressure, then the firewall flexing begins and you have to apply much more effort to get more brake response. I've got the TRD 6-pot brake kit on my car, so this part was logically the next step to upgrade the feel of the braking system and possibly unlock the higher bands of braking power with less effort on the pedal. First Impressions: On taking it out of the box it's a little heavier than I expected looking at the size of it, however being made out of steel it does feel very solid and up to the job of restricting the movement of the master cylinder under braking. It's painted nicely and the welds seem well done. All the required bolts/washers/nuts are included in a little bag in the box. Expect to find Japanese instructions that also have pictures so you can actually understand what to do instead of having to translate the Japanese. Installation: Very easy. Even easier with two people. You simply have to peel off two black sticker grommits on the side of the driver's side (RHD) strut assembly to expose two existing holes which lead into the wheel arch behind the suspension strut. Take the driver's side wheel off to give you enough room to feed the two bolts in those holes behind the suspension strut, it's a little fiddly to access if you have big hands. Luckily my girlfriend came in handy for this bit! The smaller bolt is a 10mm head with a 10mm nut, and the larger bolt is a 17mm head with a 14mm nut. Slide the master cylinder brace over the bolts, align it so that the black brace part is in line with the master cylinder and tighten the nuts, holding the bolt heads with a wrench from inside the wheel arch, BE CAREFUL to not over tighten the 10mm bolt, it's aluminum and will snap easily if you put too much torque on it. The last bit is to screw the brace so that it extends and meets the master cylinder, once it does tighten the locking nut, you'll need a 12mm spanner for that. Put the wheel back on and you're done! After 100km check the tightness of the brace and other bolts. Verdict: I took the car out for a drive straight away after installing and I must say I'm very impressed with this part, the difference in braking feel is most noticeable when braking hard, I no longer feel like I'm pushing the pedal through the firewall. It's a lot easier to get full braking power now, and even on my daily commute I can feel a difference. The pedal gives a crisp, predictable and linear response instead of the sloppy, effort-filled results I had before. There are other manufacturers that sell similar products that do the same job, but with a slightly different design and a much higher price, sometimes even 3 times as expensive! The Laile Beatrush one is excellent value for money and one that I would recommend, but then again if you're looking to maximise your weight reduction, then perhaps this one isn't for you.
-
Hi everyone, I think the standard Subaru BRZ fender trim looks great, so I'd like to know if anyone has a set for sale in the Satin White Pearl colour (37J), I believe this colour is the same as the Satin White Pearl on the GT86 models. Cheers! Ajay
-
Well the HKS Supercharger DIY install is now complete! I even threw in an AVO Oil Cooler for good measure. I always try to do car work myself if I possibly can, I have a real passion for learning about cars and it saves me money at the same time. A garage would have charged around £700 labour fees to install this kit, instead I spent half of that on professional tools that I can use again, and pocketed the rest! As always with car projects it took a little longer than expected. The quoted install time by a professional mechanic is 6-8 hours, it took Joey Amateur here about 20 laid-back hours over the course of 5 days, why rush eh? Unboxing: My dog was just as excited for boost as me! (nothing at all to do with the fact that he likes to shred cardboard like it’s... well... cardboard) As always with HKS kits they include everything you need in the box, even down to little cable ties to tidy up the routing of the pipes after you’re finished. The first thing you see when you open the box is a LOT of paper cushioning, it’s a weight off your mind to know that there’s no chance your supercharger or any components will arrive damaged. After you manage to remove the cushioning the first component you’ll see is the T59 Intercooler, it looks very well built and the welds are quality so there’s no chance of a boost leak here. Dig a little deeper and you’ll unbox the GTS-7040L Centrifugal Supercharger, again very well protected and with a little note which warns you not to rotate the pulley the wrong way round to avoid damage to the gearing assembly. Looking inside at the compressor blades it looks very precisely made with quality materials. The unit is about the same size as my hand if I open it completely flat. Further in and you have 4 other cardboard boxes containing the Supercharger Oil (HKS call it Traction Fluid), the Traction Fluid Oil Cooler and Reservoir, Intercooler piping, hose clamps, bolts etc all arranged logically so you know which part of the system they relate to. HKS also include installation instructions in English (thank god) and Japanese versions that contain detailed and clear pictures to help you along the way. Installation: You can find the installation manual here, bear in mind that the manual I received in the box has been updated in January 2016 with a few extra install steps, this attachment here is the original version: http://www.ft86club.com/forums/attachment.php?attachmentid=123913&d=1446144364 Yes you have to cut a few small parts in the engine bay, all of them are brackets with the exception of the intake snorkel and a hose or two. It’s nothing that can’t be replaced easily enough at the dealership. I used an angle grinder and it made short work of the job with a table vice to hold what I needed to cut. The key here is patience so you don’t overheat the metal that you’re cutting. It’s a good idea to spray paint any steel parts that you cut to help prevent the bare metal that you’ve just exposed from rusting, this isn’t specified in the manual but gives me peace of mind, I just used high temperature engine paint. What did I find Difficult? The intercooler mounts on the bottom of the factory crash beam with Allen-key cap bolts that you do up from the top. What the manual doesn’t say is that you have to feed the bolts in through a tiny little hole in the top of the crash beam and do them up at an awkward angle. I found a ball-end Allen key set helped me massively with this, and used masking tape to hold the bolts to the Allen keys while I lowered them through the hole, so they would not drop off the end (you could buy a magnetic holder to do this too). You need to mount the intercooler as close as possible to the crash beam to allow room for the front bumper support to re-fit underneath it. When you bolt the supercharger bracket to the car, there is a little bolt on the underside which is close to impossible to do up, you’ll see what I mean when you come to it. Again use a ball-end Allen key to help with this. DO NOT tighten the Traction Fluid Reservoir Cap too tightly, trust me it will seize and you will have an absolute nightmare getting it off. If you are struggling, the red cap cover that says “OIL” on it actually lifts off, exposing a square structure underneath, you can get a pair of mole-grips or pliers on this square to twist the cap off with force. AVO Oil Cooler Install: I chose the AVO oil cooler as it is a lot cheaper than the HKS Type-S alternative, it’s thermostatic and mounts in the same area behind the fog lights. I knew full well that I may have problems with compatibility as HKS’s intercooler sits closer to the oil cooler than AVO’s does. The installation was actually pretty straight forward, I had to cut the intercooler mounting bracket slightly to allow the oil cooler to mount straight (it shares the exact same mounting point as the intercooler). Top tip, install the hose fittings to the cooler before attaching it to the car, it makes life a lot easier. AVO’s oil cooler uses a duct to feed air to it from the front grille; I couldn’t use this because of where the HKS intercooler sits. Instead I run fog lights during street driving to prevent over-cooling, and remove them for track work to allow maximum air flow to the cooler. Post Installation: I installed a base map provided by my tuner to get me to his shop (2.5 hours away!). I’ve never babied a car so much as I did on the way there, I drove so carefully. At his shop I had the remap done and a charge air temperature sensor installed to allow the ECU to read the air temps after the air has been compressed, I also had the restrictor widened to 41mm to squeeze more power out of the supercharger! Depending on exhaust setup this is good for 300whp on Shell V-power. More pictures below!
-
Exciting things are happening in my garage at the moment...
-
Hi everyone, an update! I have ordered my HKS V2 Supercharger and will be DIY installing it towards the middle of April. I’ll be putting up another post showing the (inevitable) difficulties that I will come across installing this kit. In preparation for this I have just DIY installed an Xtreme Clutches HD Stage 1 Organic Clutch, this company is Australian based and have a number of good clutch options for the 86/BRZ/FRS. A few of the GT86 tuners here in the UK offer them as their preferred supplier, and after haggling with a couple of them I managed to get it at £300 which is trade price. The stage one is more than enough to hold the 300whp/340nm torque that I am looking for. I decided to go without a lightweight flywheel because of the drivability issues and chattering noises, so I have re-used the OEM flywheel. I didn’t resurface it and I have no issues so far, it was in a very good condition when I removed the clutch and has no hotspots. Understandable considering it’s only three years old. What’s in the box? Organic Stage 1 Clutch Disc Heavy Duty Pressure Plate 830kg Clamp Load Clutch Alignment Tool Replacement Throw-out Bearing Replacement Flywheel Bearing ACS Transmission Spline Grease A couple of Xtreme company stickers and information leaflet The install took me about a day and a half working by myself for the most part, I asked a couple of my friends to help me with removing the transmission from the engine and putting it back on. I used this DIY as a guide: http://www.ft86club.com/forums/showthread.php?t=25054 along with the service manual for all the correct torque specs for everything I removed, downloaded here http://www.ft86club.com/forums/showthread.php?t=12135 I’d say the hard parts of the install were removing the driveshaft bolts and nuts at the differential; they are quite difficult to get to and muscle off with a socket and spanner, especially working on the cold garage floor! There are also 8 bolts that hold the transmission to the engine, the top one above the starter motor was a royal PITA to get to because of all the wires concealing it from above, and the lack of room to fit a ratchet there to undo it from underneath. A lot of people say that fitting the transmission back onto the engine is the hardest part, and I agree. Having two of my friends and a floor jack helping me made light work of it though, if I was by myself it would have taken a LOT longer. A tip to help with this is jacking the engine up by the oil pan, this tilts it backwards and gives you a better angle to attack it with the transmission. I’m currently bedding the clutch in and time will tell how good it really is! It is running very well so far. Doing this DIY probably saves about £200-300 in labour fees. I’ve included some pictures below, and as always if you have any questions I’ll be happy to help out!
-
SOLD: TRD TF6 Wheels 18x7.5 +46 5x100
TRDness replied to TRDness's topic in For Sale GT86 / BRZ Parts
SOLD in about 15 hours! -
Hi all, Here I have for sale a set of 4 diamond cut TRD (Toyota Racing Development) TF6 Wheels taken off a limited edition 2013 Toyota GT86 TRD Edition in the UK. Only 250 of these cars were made. Spec: 18x7.5J offset +46 Bolt Pattern: 5x100. These wheels are in excellent condition, as shown in the pictures, two of them have been professionally refurbished by Toyota to very high standards. There are two tiny chips that are not noticeable as shown in the pictures, and the decorative black paint inside a couple of the holes for the wheel nuts has been worn from using sockets to undo the wheel nuts, as expected for used wheels, not noticeable. See the pictures for more detail. The wheels are wrapped in expensive premium Yokohama Advan Sport V105 tyres in 225/40ZR18 92Y size. As you can see in the pictures, I have had them inspected to show exactly how much tread is left. The tyres are nearly new, again with no damage. These wheels will cost you over £1300 to import from Japan, so £650 is a bargain price. I will ship these wheels if necessary at buyer's expense (around £45 for the whole set of 4), but I would much rather have them collected from myself in Crawley, West Sussex due to difficulty in packaging them. I would also be willing to drive and meet someone halfway, depending on distance. Please message me if you would like to collect.
-
SOLD: TRD TF6 Wheels 18x7.5 +46 5x100
TRDness replied to TRDness's topic in For Sale GT86 / BRZ Parts
Done, thanks. -
When I combined Keethos's and your quotes it put yours second for some reason without me noticing, putting you in the unfortunate firing line of my male reference comment! I hope you enjoyed briefly being a man while it lasted
-
^ He's right! You first send a list of your current mods to Adrian, and he makes you a base map. As Keethos said, you then go back and forth with logs using your laptop, emailing each log to Adrian who then tweaks it until it's perfect (and he really doesn't stop until it's completely perfect!).
-
I got the remap after my exhaust was installed, so I can't comment on the remap by itself. But it's certainly a noticeable jump, there's no torque dip now and the car is much more eager to rev, it pulls very well too. I'd say for the money is a good investment. Apparantly it's good for 214 flywheel horsepower, but I haven't had mine dyno'd for official figures, it's the torque you notice mostly. I went to Fensport as they offered remote mapping, and an easy way to purchase the parts I needed via their website, as I was ordering other stuff too at the same time. I also hadn't heard much about Abbey at the time, but I wouldn't hesitate to go to them if I were to do it now. In fact I will most likely go there for my supercharger remap once I have finished installing it at home.
-
Everything above London is the Midlands/North to me! Hahaha
-
My bodykit came factory installed as part of the TRD edition car. In terms of the exhaust, at first I got a local tuning garage to install it, but I recently had to swap it all back for its first MOT and did all the work myself, it's a lot simpler than I thought and I'm getting more and more confident with working on the car. As long as you have the right tools you can make any job a doddle. My remap was done remotely by Adrian at Fensport, so I didn't have to drive up to their base in the midlands. His service was brilliant and he really is dedicated to making sure the remap is perfect and suited to your mods, can't fault it.
-
Made a little exhaust clip for you all... Not sure that I like the rasp above 3600 RPM but other catbacks will make the exhaust louder, I don't want that.
-
It has a redesigned pulley (similar to V1) as they apparantly snap easily due to being held on with one bolt on the V2 as opposed to a few more on the V1. It also has no restrictor. I wasn't aware that it's not coming here? They've dropped the UK price on the V2 for the impending arrival of the V3? I could be wrong.
-
Thanks all. Let me know what you've done so far basset, I'd be interested to hear. I'd also like to know what you're looking at wanting to mod? or what your goals are?
-
Cheers guys. The car certainly feels pointy without a shadow of a doubt, the lower spring rate at the front also gives it really good grip over bumps and the like. Understeer is very rarely seen unless the roads are rediculously wet. I guess that was TRD's intention as they offer 3 different racing spring sets and they are all split front/rear in a similar fashion, just with higher spring rates still (i have the set with the lowest spring rates). I would say at the limits the car is very balanced and twitches easily into oversteer with a small burst of throttle. I was running TRD TF6 wheels with 225 tyres and the car would oversteer simply with a yank of the steering wheel into the turn, now I have the Advan GT's with 255's and the grip feels like it's all but endless but you can still oversteer with throttle input. With regards to the remap I haven't had it dyno-tested. It was done over a year ago and if i'm honest the 240hp figure was what i thought i was told by fensport when it was done, so I could be wrong with that. You're probably right with it being around the 218 mark, i'll edit the thread. I would say though that it changes the car a hell of a lot - i recently had to reflash it back to stock to change the exhaust over to stock and get it through its first MOT, and after driving it for a few days I swapped it over again and re-flashed the remap, it felt hugely different! The low-end torque increases very noticeably, the mid range is more powerful but less noticeably, and the top end you can really feel the power increase. I would recommend it and say it's definitely worth the money!
