
Samwise
-
Content Count
273 -
Joined
-
Last visited
-
Days Won
29
Everything posted by Samwise
-
Thank you all for the kind words Really great to hear one way or another. Ofcourse it might not be for everyone be it the widebody/rocket bunny style or the colour or wheels, etc but it would be boring if we all enjoyed the same things and yet at the same time it's cool to appreciate each other's cars/taste and so on. 😁😁
-
No worries, I heard from Rob that you couldn't make it Yeah i met him at JAE last year (when you saw me in that convoy lol!) his car is super clean inside and out and rightfully won "best toyota" that year. Was good to get the two of them together.
-
Haha it's on air-ride you know that
-
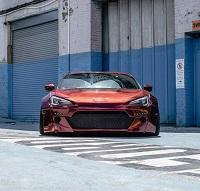
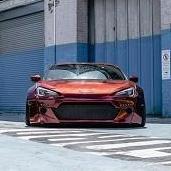
Well without wanting to bore you lot with silly words. Here's the reveal video and a few of my favourite pictures!
-
Valenti Jewel Smoked LED Headlights Including OEM Toyota HID Ballast & Leveling motors
Samwise replied to Samwise's topic in For Sale GT86 / BRZ Parts
Price dropped to £550 -
Thanks! I'll post a whole chunk of colour pics by the weekend!
-
Just got it back today, so not trying to be too much of a tease but here's a little preview to wet people's appetite! Going to take it out over the rest of the week with my younger brother who has a DSLR and small drone to try and get some good looking video footage and shots of it before posting it up in full colour along with a little reveal video. I'll still be down at Fuel this Saturday come rain or shine so if you want to head out for a coffee, catch up and to see the car I hope to see you there! 😁
-
The time is nigh to get the car back from it's wrap, just a bit of a shame that the weather is so shocking this week! I'll be saving posting any pics up until i've had a chance to get it outside and make a little "reveal" video but also because I really want to take it down to Fuel Coffee house just outside Henfield This Saturday (they open at 11am) to give a chance to have a little meet with friends and anyone that's interested in seeing it in the flesh before i post up any videos/pictures online, so if you'd like to pop down for a coffee and to see the car, I hope to see you there! But in the meantime i've made a few small videos for my youtube channel. The first couple of videos were a 2 part vlog just going over the history of the car, the repair, the costs, etc which of course anyone reading this has likely already seen so I won't bore you with a link to that but the other shows off the completion of the custom fibreglass work on the Rocket Bunny diffuser. It was quite a long process which wasn't without it's headaches for both myself and the painter but i'm thrilled with how it turned out, the idea i had in mind coming to reality really pays off. After getting the Surround of the "V" light fibreglassed in to rocket bunny diffuser it was largely a case of tweaking the position, fixing any cracks that occured from that and then building up the surrounding area with Fibreglass based filler and eventually fine body filler. Doing so allowed me to sand back and form the shapes that I was looking for around the edges of the light so it looked as intentional as possible. When it was close to completion i then passed it off to a friend of mine who wanted to finish up the filler work and then paint it gloss black, unfortunately for the both of us my fibreglass and filler materials reacted quite badly with his paint which I know can be quite a common issue for painters when dealing with someone elses' work which was why he wanted to finish the filler work himself but unfortunately I think it was a bit late at that point as the bulk of the material had been added by me. Either way some fantastic work on their end they were able to get it complete and it came out looking incredible, super smooth and in a really glassy gloss black finish. I delivered it down to Monster wraps and i'll see it next when I get the car back! Video of the diffuser work here: https://youtu.be/cFae3AD4A0k
-
Aftermarket headlights & tail lights.
Samwise replied to Leonard's topic in Wanted GT86 / BRZ Cars and Parts
I've got a set of Valenti Headlights currently for sale: -
I can't wait to see it either. Will be popping up there early next week to drop off the freshly painted rear diffuser as well as a new set of boot hinges (the OEM ones on the car are red ofcourse, from the factory and I can't expect them to wrap something as intricate as a boot hinge so i picked up some new black OEM ones) so when i'm there i'll be getting a sneak peak of how the car is can't wait! for now there's been some more little videos: https://i.imgur.com/UPZ6d1J.mp4 https://i.imgur.com/3vHn6xb.mp4 https://i.imgur.com/upGWaTJ.mp4 https://i.imgur.com/NPzT9fI.mp4 It appears they're actually going further with it than originally discussed taking the wrap all the way under the widebody and even wrapping over the sections of the cut arches that have a layer of underseal around them. Ofcourse in reality this doesn't matter either way as the arches cover all of that up but assuming that it doesn't lift or peel at all near the underseal it's good to know no pesky eyes will be able to peek up my arches (that's quite the euphemism) and see the original red under them.
-
Yeah, there are a few cars with that look but in reality it's either a case of natural (or fake/paint) patina on an old american car or a wrap. There's a few wraps where people make their car look like a race car complete with race fatigue, sratches, rubber marks, etc
-
it was a couple of weeks ago so perhaps I got lucky and grabbed one of their last ones in stock 😯
-
So with the new headlights installed it was time to wrap up the final assembly of the car ready to drive it to Monster Wraps One thing I wanted to do while putting the car together I wanted to check out to see whether i could lower the car a little further as there's still a gap from the sideskirt to the ground when fully aired out and the answer that?.... NO. As you can see the chassis is very firmly sitting on the tyre at the front, but it's not the end of the world the car still looks incredible when fully aired out and practically sunken in to the ground with the bodykit hanging a bit lower than the stock body. With that confirmed I moved on to continue some of the glass fibre work on the diffuser (sorry no pictures, check out the video!) and the final assembly of the car ready to drive to Southampton on Friday. With the car all back in one piece I couldn't resist driving it out in to the sun, rinsing it off to get rid of any loose dust and taking some pre-wrap beauty shots! Check out the latest video and the pictures below!
-
It was from a recent group buy via the facebook groups but i think it was the D2H kit from these guys: https://www.gtaretrofits.com/shop/vehicle-specific/frs-brz-gt86/2013-frs-vland-specific-hid-kit/
-
Thanks everyone for all the recent kind comments. I'm really looking forward to getting the car back to a "finished" state and getting it out and about! Before I take it off to get wrapped this Saturday i might stop by Fuel in the morning for an hour or 2 for a coffee and chat with some friends. I'll confirm what my plans are and definitely let people here know if so! But for now, another update: A bit of a small one in a way but last week before getting the car back in one piece I wanted to change my headlights and install and AC delete kit while I had the front bumper off. With the AC delete i've been contemplating it as i've never actually got the system fillled up in the 2 years i've owned the car so why bother having all the gear, pipes, etc making a mess of the engine bay, blocking the radiator or taxing the engine if it's not doing anything, plus I might be able to sell the condenser and recoup some of the costs and eventually sell the AC delete (When i remove & sell the engine) and again recoup soem of the costs. So with that in mind I went ahead and purchased the AC delete kit from ICP https://www.importcarparts.co.uk/par...y=&searchPart= The process of Installing the delete along with removing the condenser and AC pipes was reallly easy, so easy infact that i forgot to take any pictures but covered it in my latest video. Following the AC delete and went ahead and changed my headlights, Opting to swap my rather expensive Valenti headlights for a set of Vlands with a HID kit. My main reason for this was that despite the valentis being a great bit of kit and no doubt much better build quality I simply prefer the look of the Vlands. Plus this allows me to sell the Valenti lights! I don't have a decent before/after comparison but you can see plenty of pictures of my Valenti headlights on previous posts All of this is covered in my latest video. Give it a watch!
-
It was something they offered, essentially for free (so they can take some nice glossy pics of the car for social media I imagine as its a change from the usual audi, bmw or tesla) but it'll make the car easier to wash in the future - more protection is never a bad thing but isn't as much functional on a wrap rather than paint.
-
Cheers, i've seen some really nice satin colours actually but for me i think a gloss tone does it that little bit more. Monster Wraps are charging me £3k to wrap the car including Door Shuts, Boot shut (which i requested) and a Ceramic coat. They've advised it'll take them 2 weeks as they've advised it'll take them longer than normal due to the nature of the car but hopefully with the prep work i've done (i'm even making them a small manual for all the little Quirks in removing the body panels) it should make the job as smooth as possible for them.
-
Cheers! they'll wrap the arches and the body seperately and then re-mount the arches. I don't mind the rivet-on look so i'm more than happy with that otherwise I would have moulded the arches on to the body.
-
Over the recent weekend I was able to have a few friends over to the workshop and over the course of a single very sunny Sunday the whole Rocket bunny kit is now prepped for its wrap. I'm quite lucky that a couple of my friends have wrapped parts of their cars before and one of them even works in the bodywork department at BMW (We gave him the whole front bumper to do!) so I knew they'd do a good job alongisde me! We started off by keying up the panels with some 320 grit and getting rid of any motting/orange peel in the FRP as well as any extra blobs of material that were stuck to the surface, followed by a couple of healthy coats of grey high build primer. Once it was dry and ready to sand we applied any filler or knifing putty in areas that needed it, there were a couple of cracks and some scratches or air bubbles that had to be filled and finally all the panels were finished to a wet 800 grit finish which should be plenty for the wrap to adhere to nicely and no inperfections to speak of! The video for it can be found here: We all really liked how the front bumper turned out in its sanded back primer look ironically, it sort of looked like a comic book sketch or some kind of video game (If anyone's played Borderlands you'll know exactly what i mean!) But in just under 2 weeks the car will be off to Monster Wraps in Southhampton to have the wrap applied and I can't wait! I've got some small jobs to get done before then and I need to continue work on the diffuser so that it's ready by the time the car is complete.
-
Yeah fantastic bit of kit! Wouldn't mind swapping the other arms out for their gear as well if I had the funds but what i've got now will do to allow me to sort out the toe and dial out the negative camber in the rear. I'd really love SPL's front lower arms to play around with camber and caster adjustment with them but that's a big spend
-
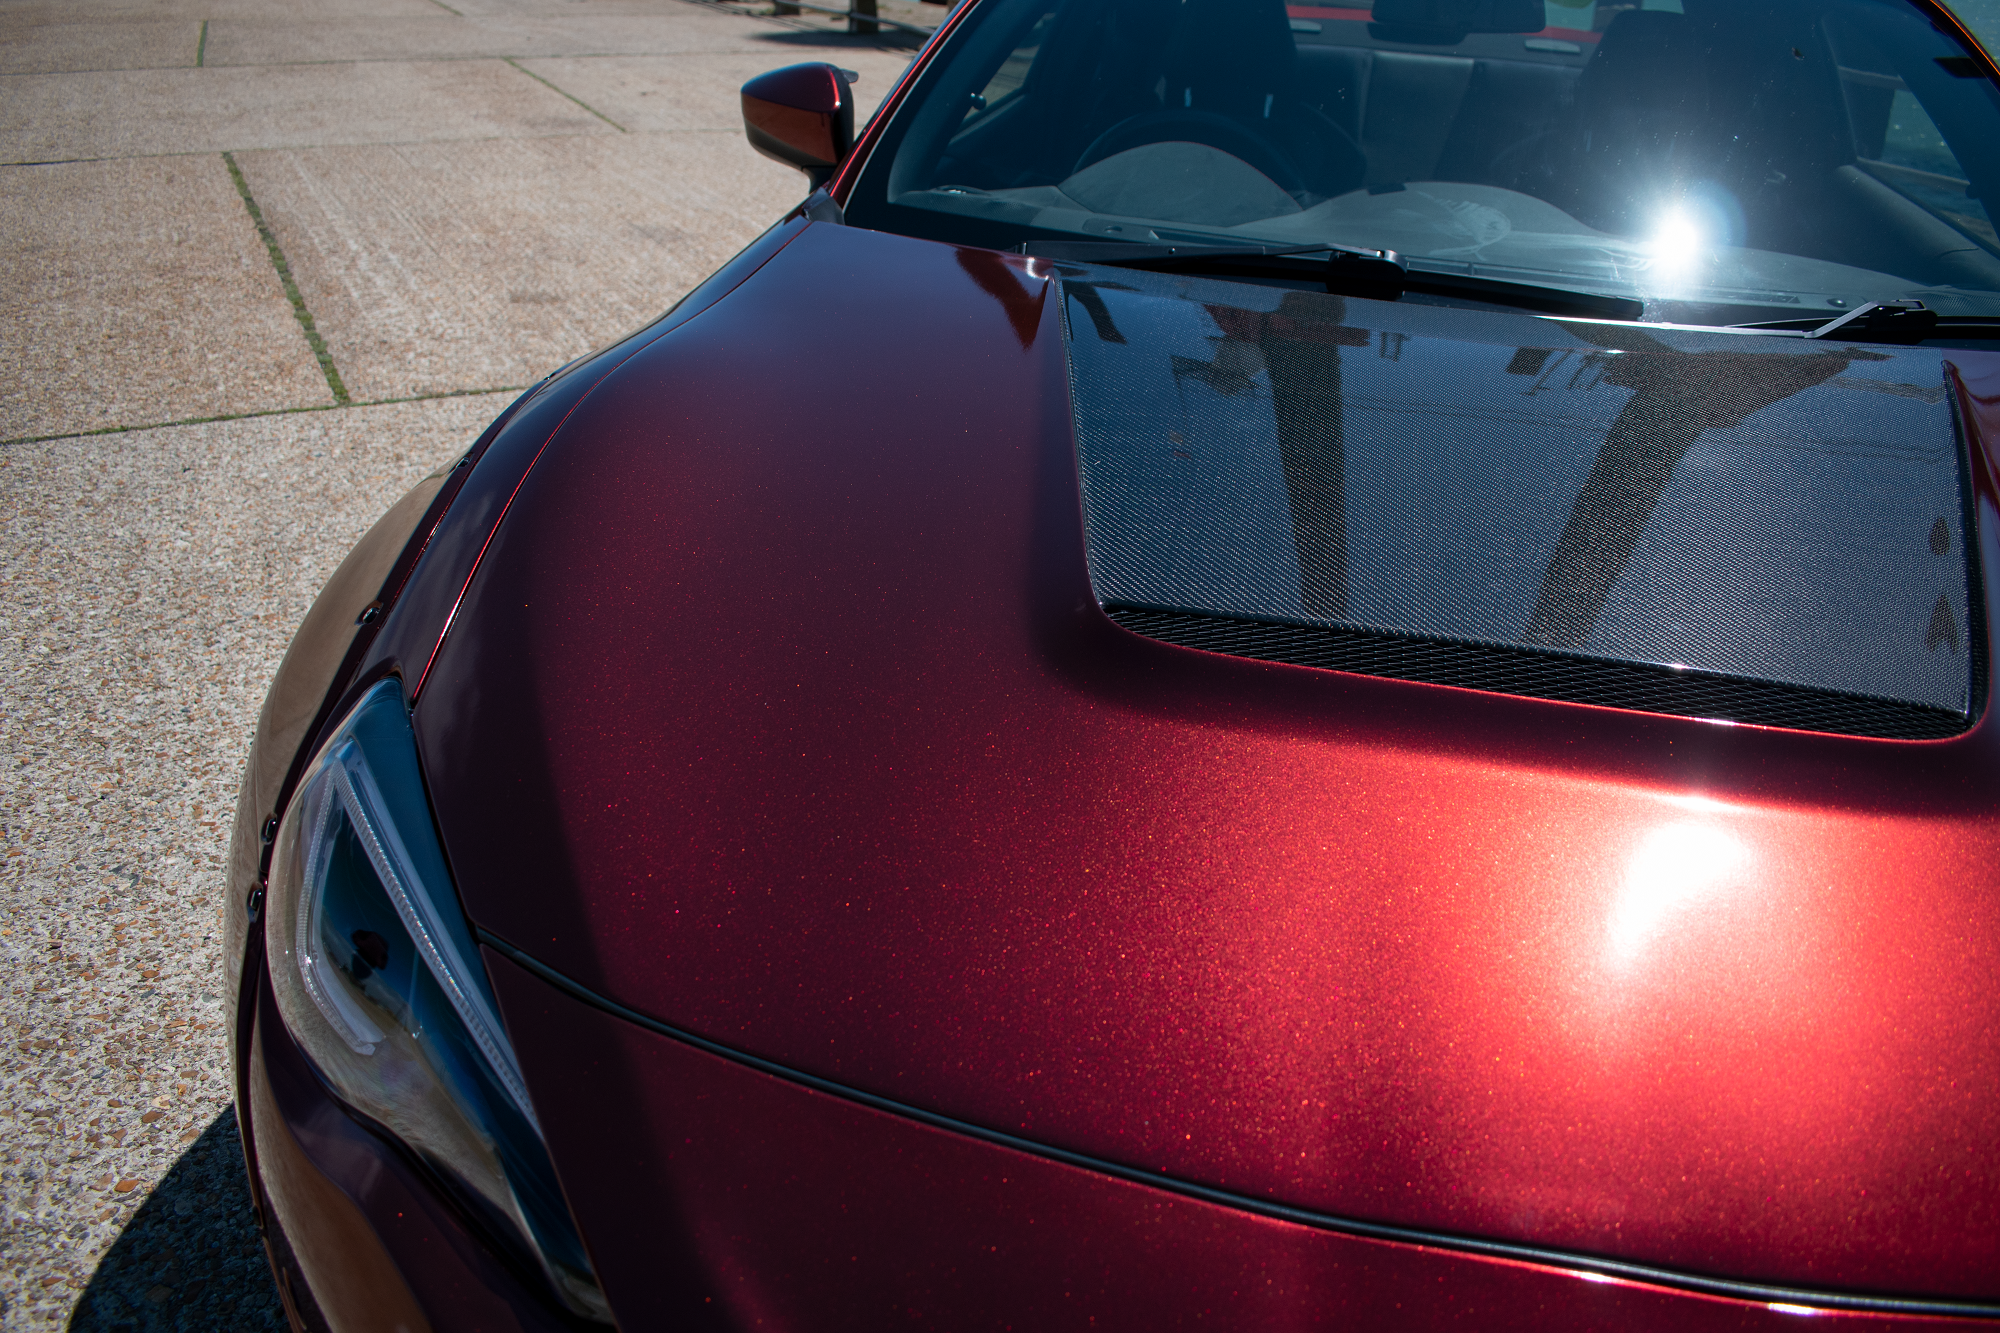
So with the Rocket Bunny kit now officially installed I'ved moved on to prepping the car for its wrap. I've chosen to go with a wrap over paint for a few reasons, the first being cost of course, the next being that i'd like to change the colour of the car (still staying somewhat red) as the original red on the car is very flat and if the rocket bunny panels were matched to it I feel the new curves of the body would be lost in the flatness of the OEM colour and finally if I were to do paint i'd like to go the whole 9 yards and spray the whole car inside & out including engine bay doors, etc. So with all that in mind I've decided to go for a wrap which i've been in talks with a company down in Southampton called Monsterwraps which appear to do some very good work as well as get great reviews. Not wanting to skimp out on the fitting of the wrap ofcourse or do it myself i'd rather pay a sensible price to get a good job done. However as I mentioned i've been in talks with them to confirm how they would tackle the kit, the Wellnut holes and what prep work I can do to speed up the process as of course the car is far from factory fresh. With that said the car is now booked in to have the wrap installed the week commencing the 15h of June giving me just over a couple of weeks to get it prepped and ready to go! Check out the first video related to it below where I talk about the proceses as well as my choice in Colour. https://youtu.be/fhDIo2cXzVo As far as colour choice goes i've shared it with a few people but i've not been keeping it much of a secret or such. I wanted to stay close to red and have a nice deep gloss to it which lead me to find KPMF Black Red Iridescent I think this will look amazing on the car and I can't wait to see it completed!
-
So last weekend was a big one. The car was back on the ground, aligned, driven on the road and it had the rear arches welded closed. After that I fit the Liberty walk rear wing and with this the Body kit is essentially "finished" on the car. The Next steps will be bodywork and a wrap! The full video can be checked out below and i'd also just like to thank anyone that's taken the time to watch my videos so far as well as subscribe as I hit the 100 subscriber mark this weekend which i'm quite chuffed about! but let me go in to more details.. So i started off by fitting a new set of rear-trailing arms after getting a refund from Driftworks as I was a bit of an unlucky sod in their their units didn't fit so I went with some from SPL which are a fantastic bit of kit and very easy to fit however they allowed me to centre up the wheel in the rear arch and using the good old string method I was able to align the car as I was quite worried about my toe being out on the rear which I found out it was and was able to zero it out a bit more. This was just because i didn't want to totally shred my tyres to pieces when driving around. Once this was done I was able to drive the car home for the first time, what a great feeling! I missed the sound, the low seating position and surprisingly it didn't feel incredibly wide on the road, it was easy to drive it with confidence and felt nimble and agile. The tyres were grippy and the front steering was a tiny bit heavier but that may just be down to being quite used to my daily driver. The new brakes feel great and the car stops on a dime, theres no darting either side and it feels just like OEM only.. better! I pulled it in to the drive way and couldn't help getting a load of pictures from all angles to mark the occasion, it looked fantastic in thes un as well even if it was covered in dust all over. The next morning it was up bright and early, something i've not done in a while to get over to my friend's workshop to get the rear arches welded up. My Friend has been running their own fabrication and custom furniture business for the last couple of years now originally picking up welding as a hobby to work on their own car and eventually growing it as a skill and passion in to their own side business. I started off by cutting the 1.5mm sheet metal to shape using the templates I had made previously and this saved alot of time in any guess work with the shaping of the metal. Once that was done it was able to be fairly easily zapped in using with Mig welding. Choosing to go for Mig over Tig as I believe (in my very limited knowledge) that it's far easier to control the heat with mig and therefore there's less risk to the thin sheet metal of warping or burning through it. So with my fabricator (haha) hat on again I got to work as their assistant for the day with cutting and prepping the panels with primer! The results were fantastic! it came out really well and we were able to get both sides finished in a single day. After Zapping in the sheet metal we tidied up and ground back the welds before applying weld through primer, seam sealer and a healthy coat of brush-on Underseal, hopefully the work we've done won't be rusting any time soon! I left it at their workshop overnight to let the underseal dry somewhat rather than get loads of roadgrime stuck in it and once again it drove beautifully, got plenty of looks and attention even in its Red/black ladybug form And at the beginning of this week I finished up the saga by installing the rear liberty walk wing. Much like the rest of the kit there's plenty of bodywork to be done but with the aliminium plates tiger sealed in to the ducktail and extensions I was able to bolt down the wing which should be plenty to keep it on the car! but i'll still give it some back up in the form of a sealer once it's all said and done.
-
So the end of last week I started tidying up the rear end but more importantly preparing the car to drive over a friend's workshop to get welded up. With that in mind I had to briefly tidy up the rear arches, temporarily re-fit the rear diffuser (for the light) as well as fit new number plates and work on making some card templates to make our job of cutting sheet metal to weld in that much easier! The whole thing can be seen in the latest youtube video here: So starting off with something totally different - the rear wing! I initially had the thought of cutting some steel plates, having a nut welded on to the back of them and then bonding them to the inside of the wing but that would just mean more work for us on the weekend while I had a chunk of what must be 8mm thick Aluminium lieing around. I decided to make some small plates, drill and tap them and use that as the brackets to hold the wing down on the car, eventhough its Ali the glass fibre of the wing will likely crack and break before the threads pull out of the soft Ali and i don't really see either happening any time soon so I ofcourse started off by making some cardboard templates. They were able to slide easily inside the wing with a decent enough area over the inside lip of the wing to hold the weight of it with nothing but the cardboard, and in the position you see the dots on the full length section of the wing line up perfectly with the OEM wing holes in the boot, result! So with that done I cut them out of the Aluminium, drilled and Tapped but... my only tube of tiger seal was a tube of grey jelly instead, so it'll have to wait until I can get the new lot in the post. So moving on from there to a brief update on the diffuser, so following the recent hackery of the rocket bunny unit i was able to roughly glue in and then lay some glass fibre over the "V" light section in to the rocket bunny diffuser, i'm quite pleased with how it's turned out so far as it is in the exact position and angle i envisioned and now just needs to be assaulted with a vulgar amount of filler and sanding. I also fit the light back in to it and fit it on to the car, just so when i drive it I would have all the required reverse/fog lights, etc. And finally moving on from there once more I started making the templates for the sheet metal to be cut and welded in on the rear arches. Quite a simple process really which I had a few small tricks for which I show in the video but I was able to make 5 small templates for each side which gives us some fairly simply and easy to handle cuts of metal. I'll be going more in to the welding/sealing process in my next video and update but here you can see the pretty simply little templates I made. After doing this process on both sides I... made some clingfilm seal to close up the arches.. just so i could drive the car without any junk and rubbish flying in to the inner arches... hey if it works it's not a dumb idea right?
-
So this week with the rocket bunny install for the most part "finished" I've been wanting to go back over the car from front to back to refine, re-work and perfect the fit and finish of the kit along with having to go about some other tasks such as re-water proofing the front arches, making clearance for the front wheels and rust proofing the work for that clearance. I was able to get a tiny bit more negative camber from the front by swapping the camber bolts to the bottom strut mounting hole, this will just ensure that the front suspension can compress properly without pushing against or damaging the rocket bunny arches. Unfortunately i didn't get to achieve the proper fitment I was after on the front arches which is to have the kit fit fairly flush against the body without having to resort to using the supplied rubber trim as I prefer the look without as I need tot put a bit more time in to it however for now its good to have the arches back on the car with the correct hardware protected from any rust and with the wheels fitting properly. For the wheel clearance I had to make some relief cuts in a spot welded lip holding the cap at the end of the sill in place, not wanting to go wild and cut it all away I decided to just hammer it back, seal it up where needed and give it a thick healthy dosage of underseal, hopefully it won't be rusting any time soon! Likewise one problem with cutting the OEM arches is not being able to re-fit the original arch liners however the most important area is the large window leading in to the engine bay, i was able to cut and reuse this section of the arch liners to stop any water, leaves, mud, etc from flinging in to the engine bay and will continue to make additional arch liner sections to add to this however i'll have to keep the wheel travel in mind when thinking about this. Check out the video below!
-
Another week comes to a close alongside another update on the 4k GT86 this week i started working on installing... then uninstatlling and modifying the Rocket bunny diffuser on the GT86. It was really easy to fit after cutting the OEM diffuser however my goal has always been to modify and integrate tthe original "V" Fog light/Reverse light combo rather than install the Rocket bunny supplied reverse light. I started this process by cutting both the OEM diffuser as well as the rocket bunny diffuser to carry out this modification. I'll continue this next week following some messy glass fibre work but for now I also checked out the Liberty walk spoiler for the car. It looks fantastic but there's no obvious way to fit it without simply using 3m Tape/Polyurathene sealent. I want to try and make a plate or bracket to hold it down with a few bolts just incase the tape/sealent were to ever fail. I talk about all this and alot more in the lates video on my channel: https://youtu.be/TOPdec23yVE
