
Stutopia
-
Content Count
300 -
Joined
-
Last visited
-
Days Won
6
Posts posted by Stutopia
-
-
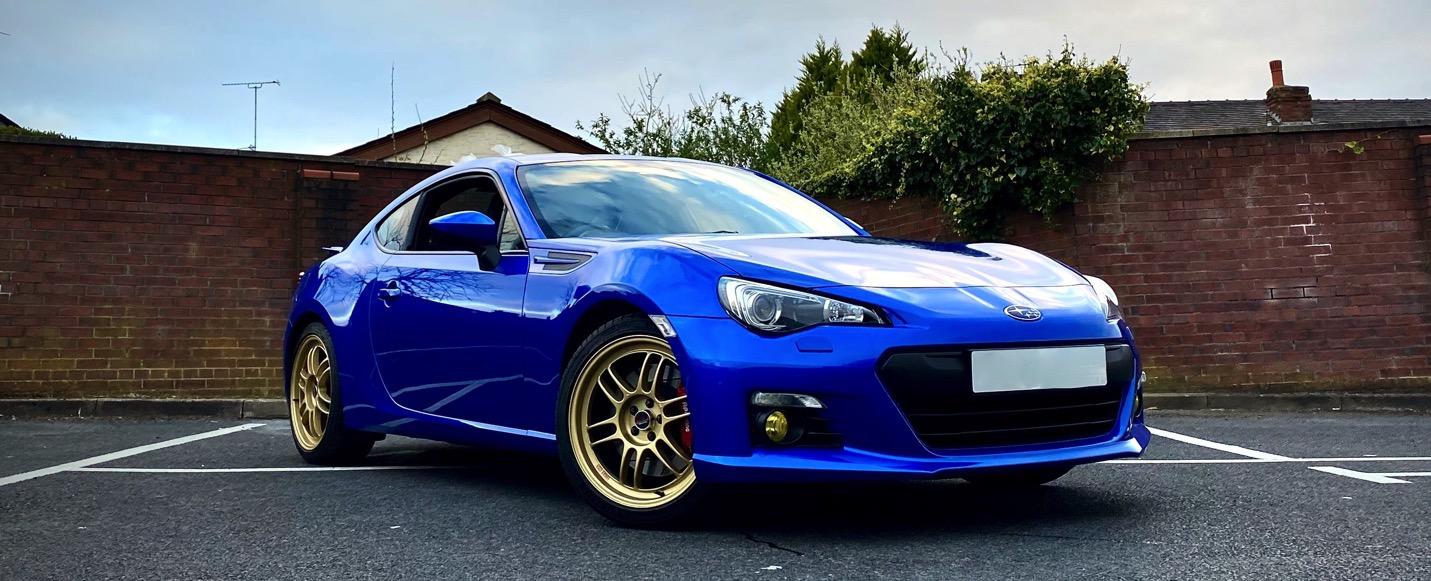
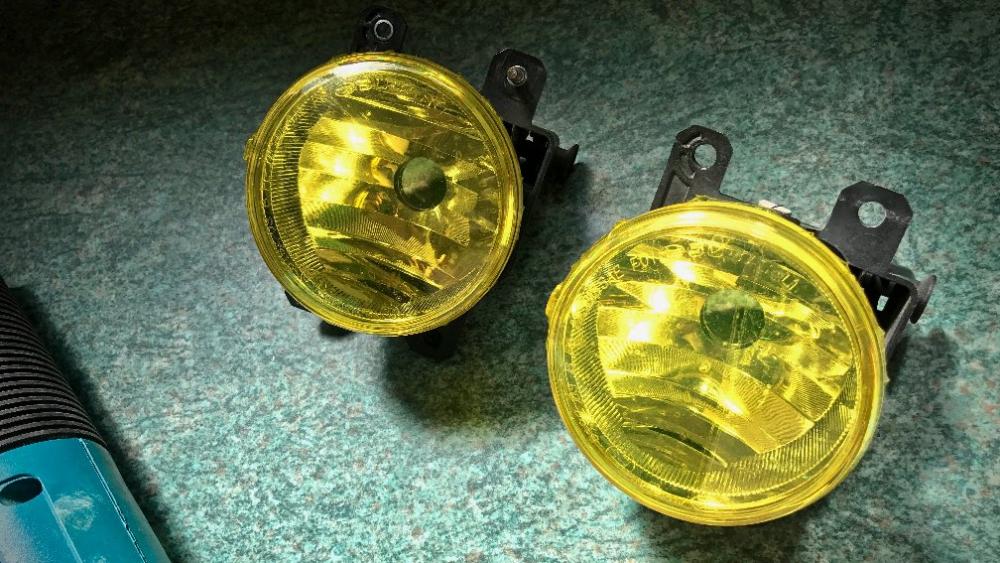
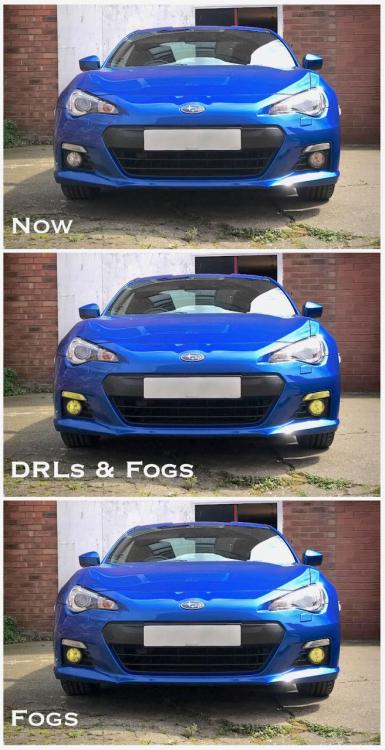
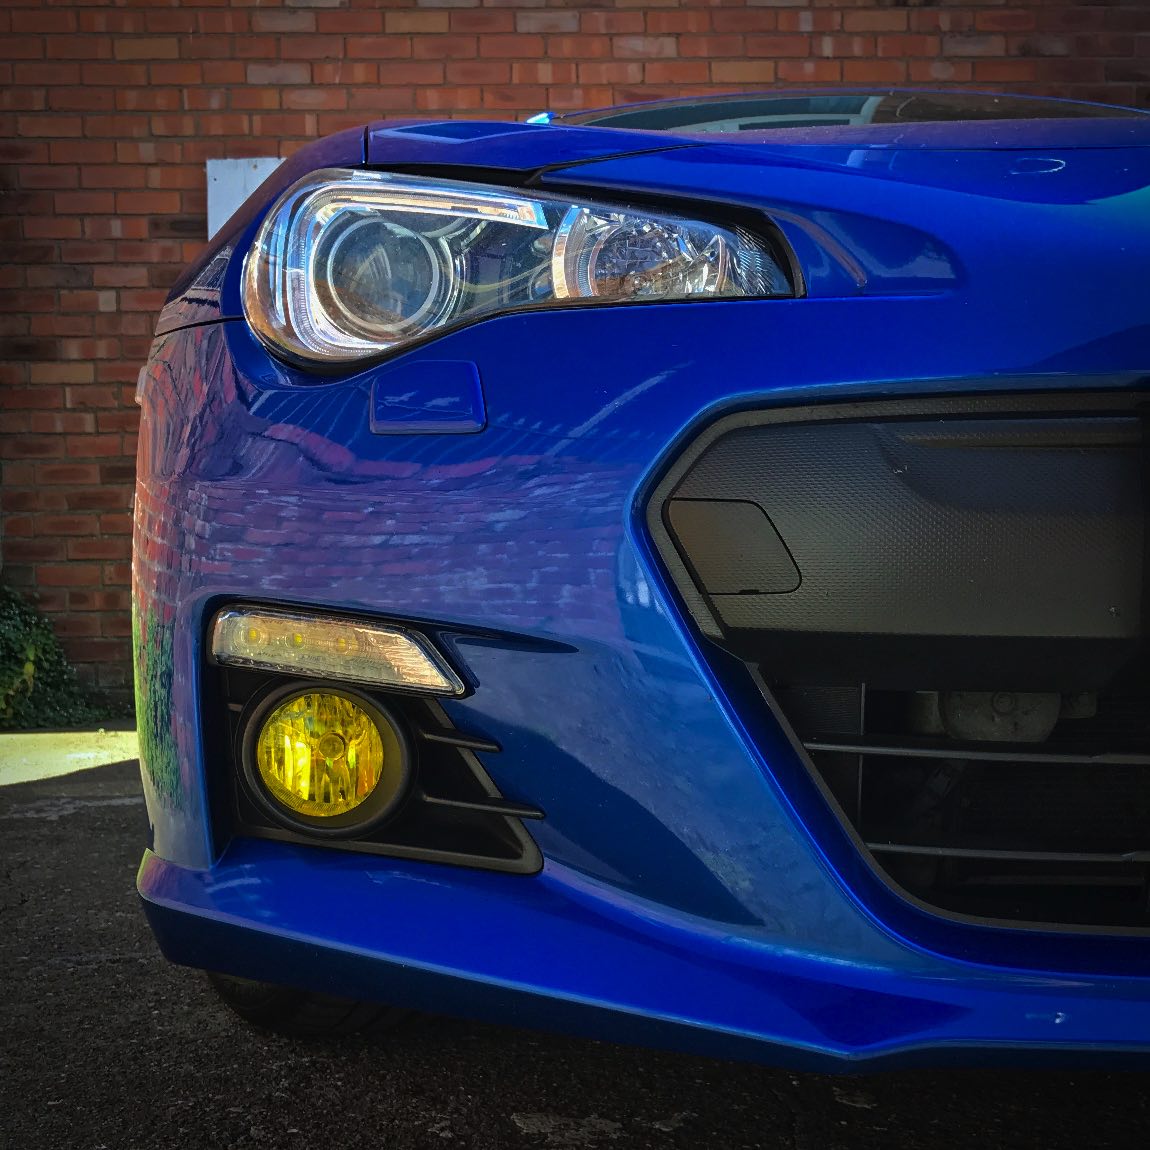
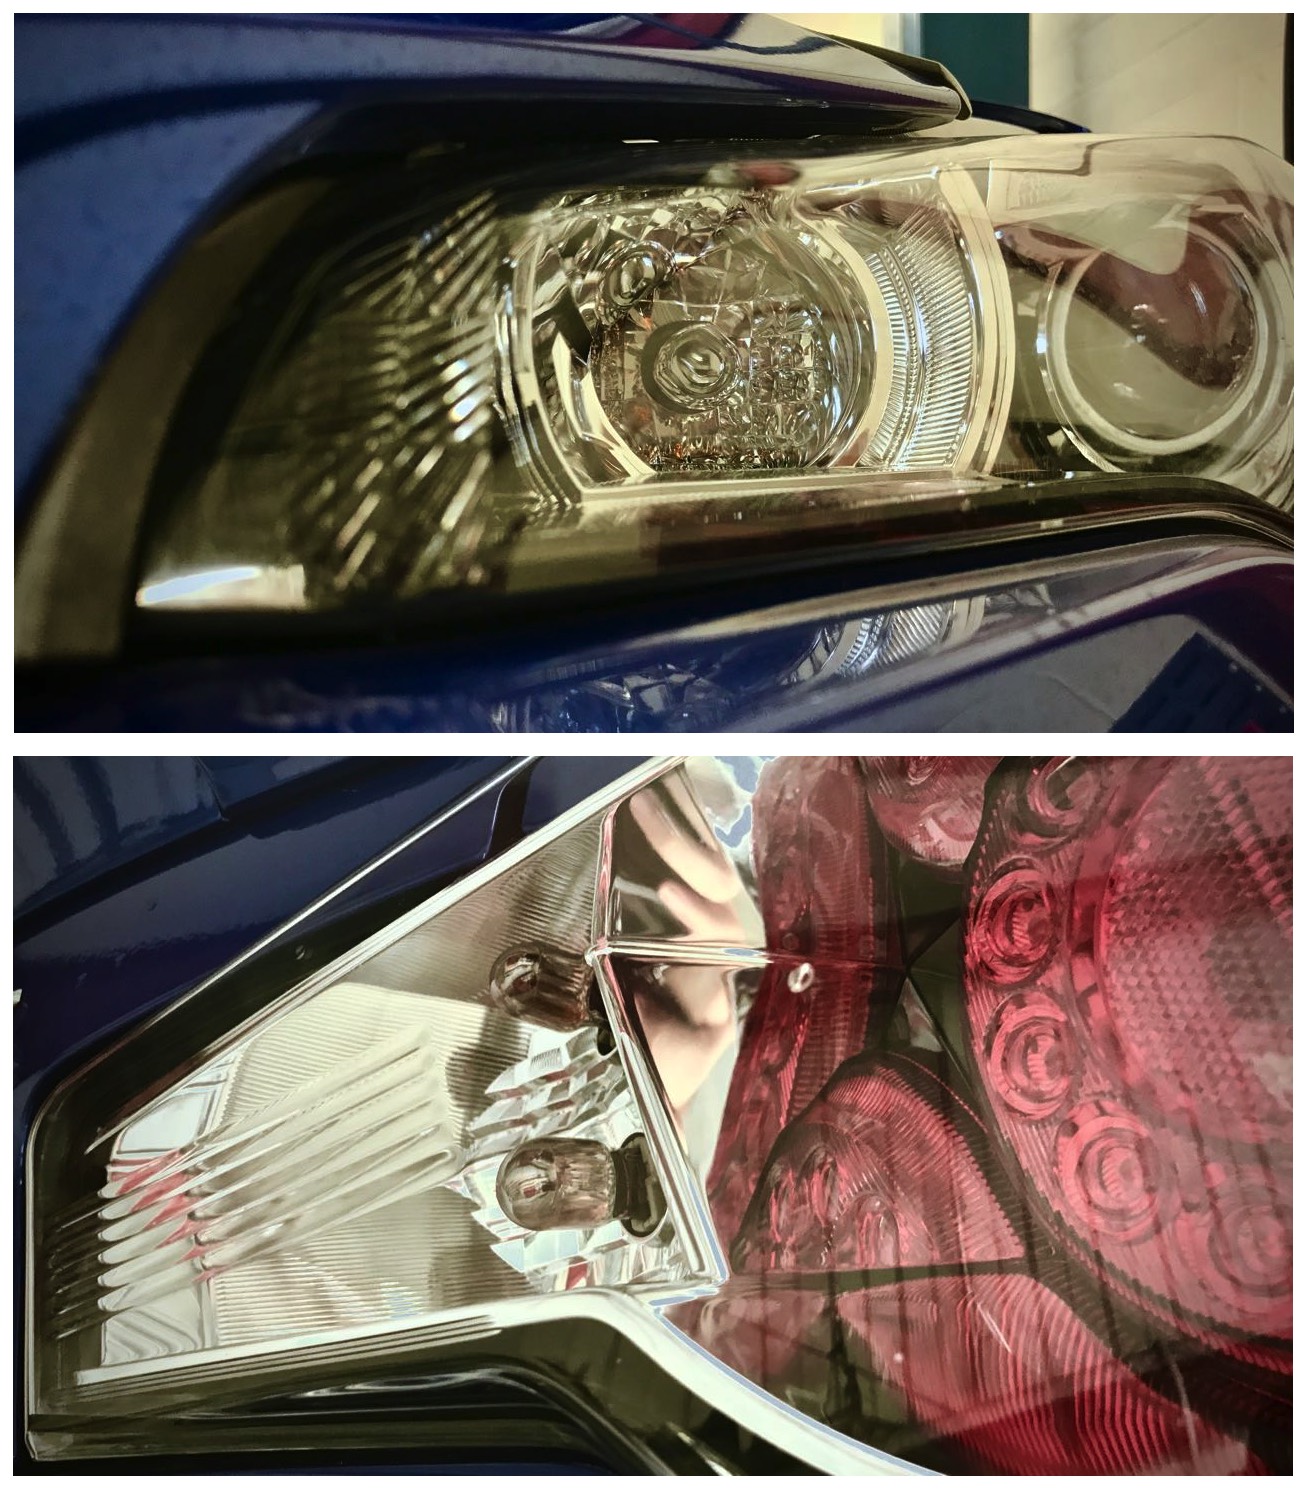
I'd seen these on @Gudzy's 86 on a Zed run in Wales and I've been lusting for them from before I even bought the BRZ. Confident that I'd read on the internet the fog surrounds simply pull out, I set about getting them off the bumper to wrap the fogs. 10 minute job, yeah?
Some swearing later...
It turns out that not EVERYTHING you read on the internet is true.
So, I whipped these three plastic trim clips off the arch liner.
.thumb.jpg.53d3bcc79670d07a726ad6457acec981.jpg)
I couldn't shift the one on the underside, but with my small hands and arms I managed to squeeze in. Losing only 6-8 square inches of arm skin
")
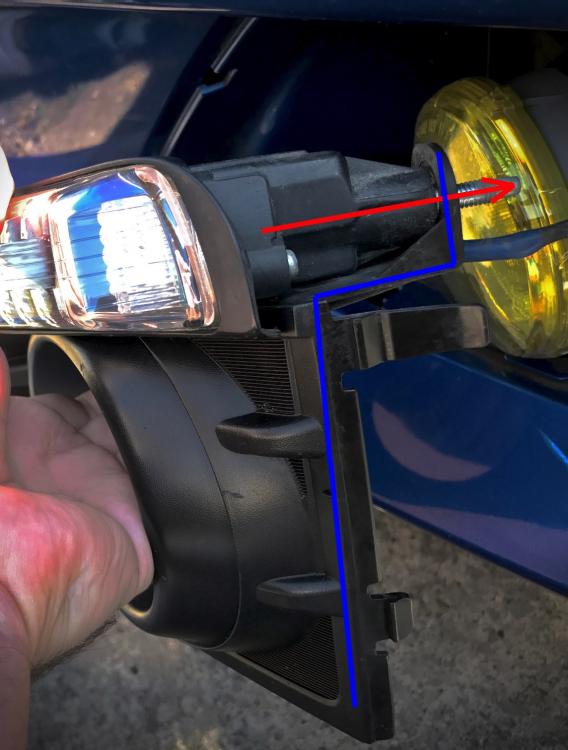
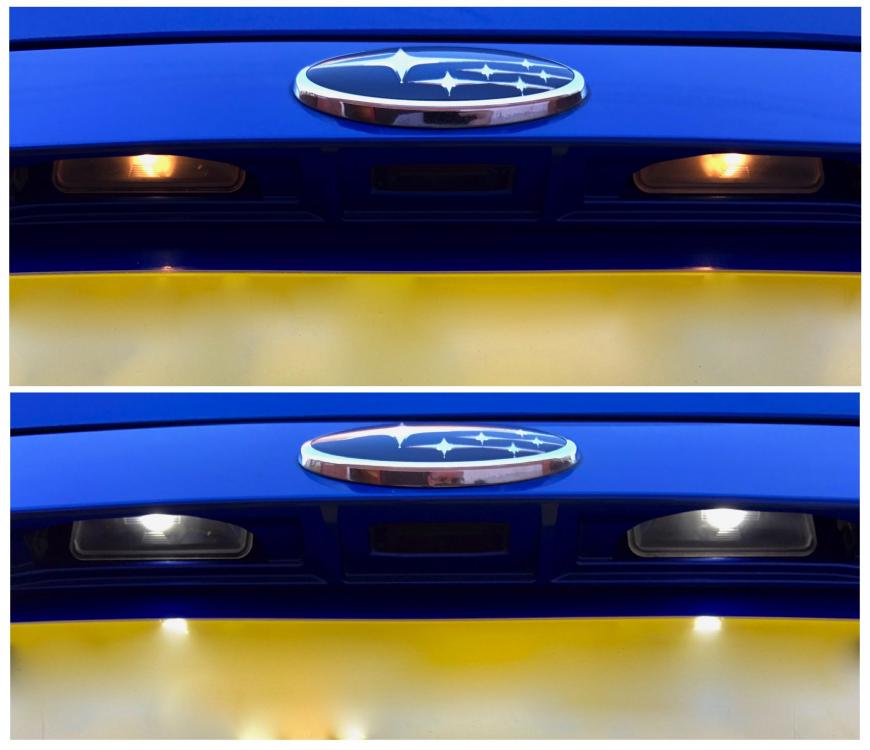
Pulling the liner out the way a bit revealed this. You want to whip off the nuts on the DRLs before trying to remove any trim. Then it's onto the fog's screws.
.thumb.jpg.c5e4dcb1cef8f8b3f9fd97800beb195b.jpg)
Once unbolted and unscrewed I found it was easier to take everything out the front of the aperture, than mess around behind the bumper. As you can see below, the DRL's sit through the back of the fog surround, there's no way that is coming off with the DRLs in place.
Next lesson learned was that wrapping is not as easy as it appears on YouTube. I wouldn't begin to recommend an approach for this, other than to say heat is a must. After ripping off the first effort, numbers 2 and 3 left me relatively happy. Mainly because its the fogs, so who's ever poking about down there

Reverse job to put it all back together again. TOP TIP - make sure the fog is properly seated on the side which is not screwed in, otherwise it will flap about.
Et voila.

I'm rather pleased in the end.
-
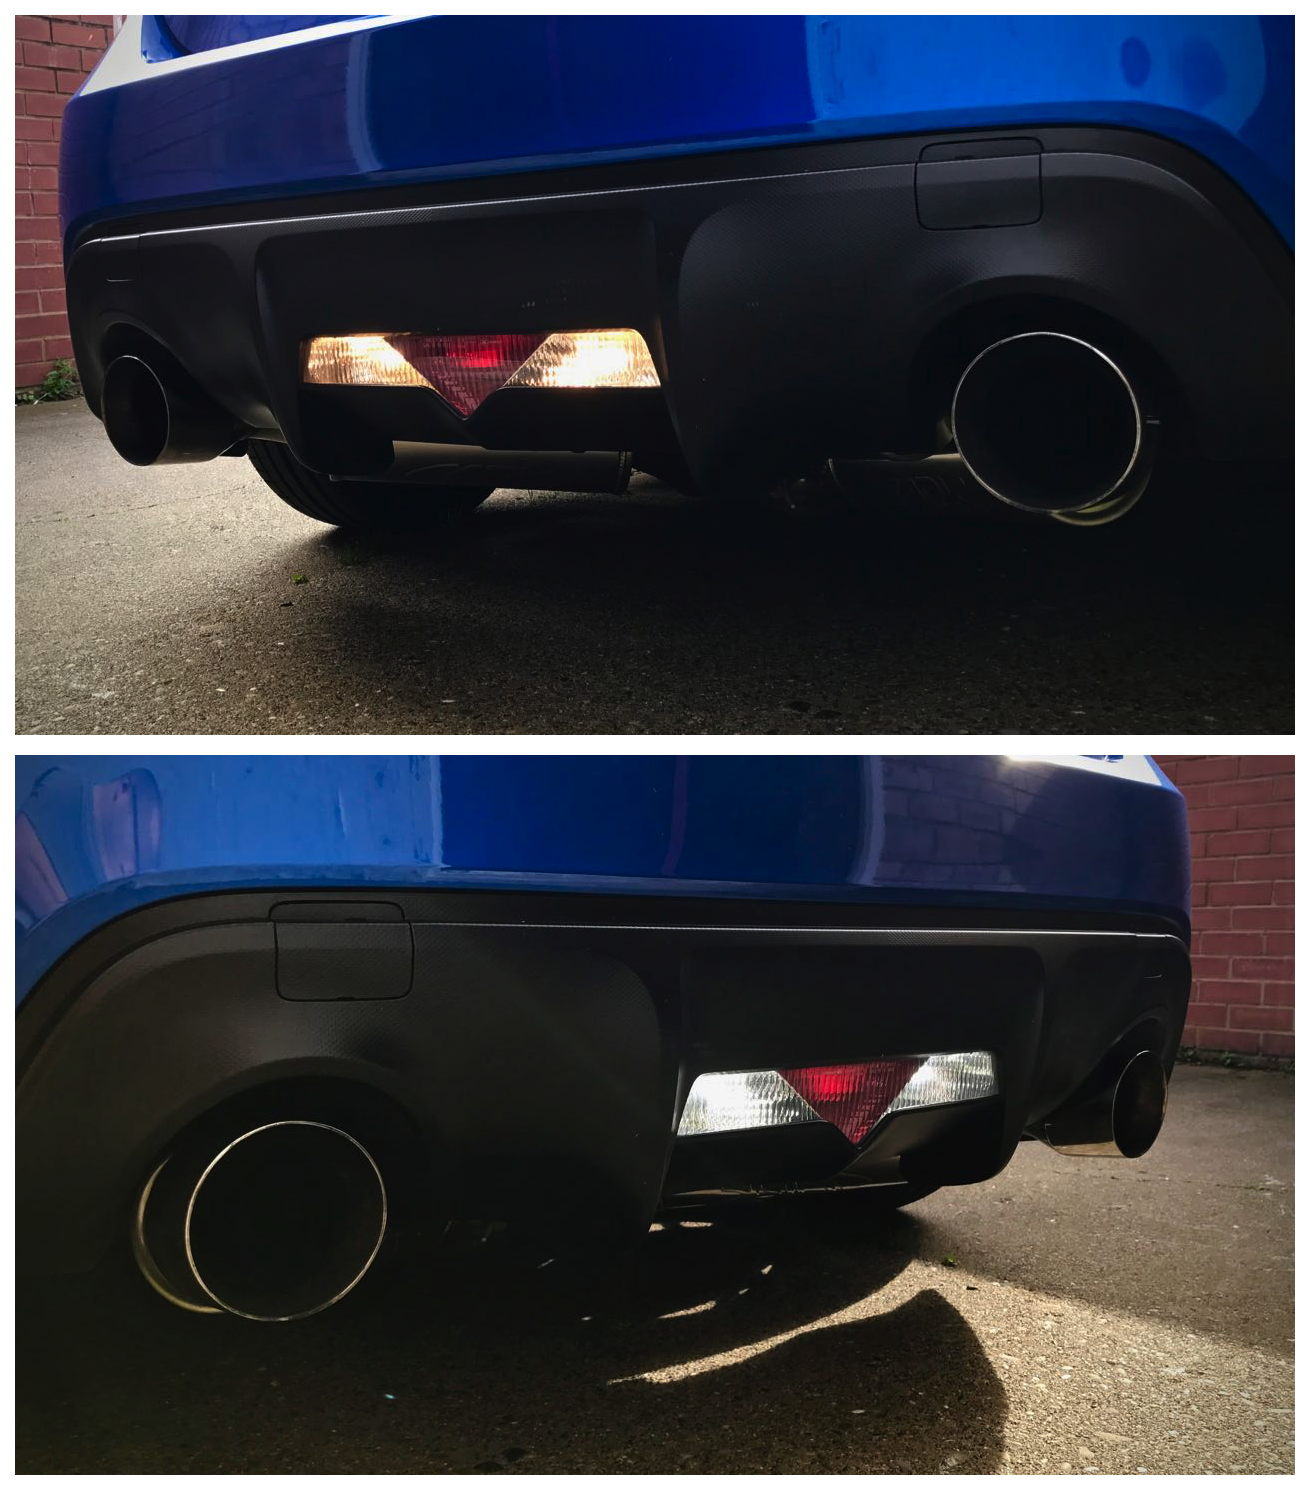
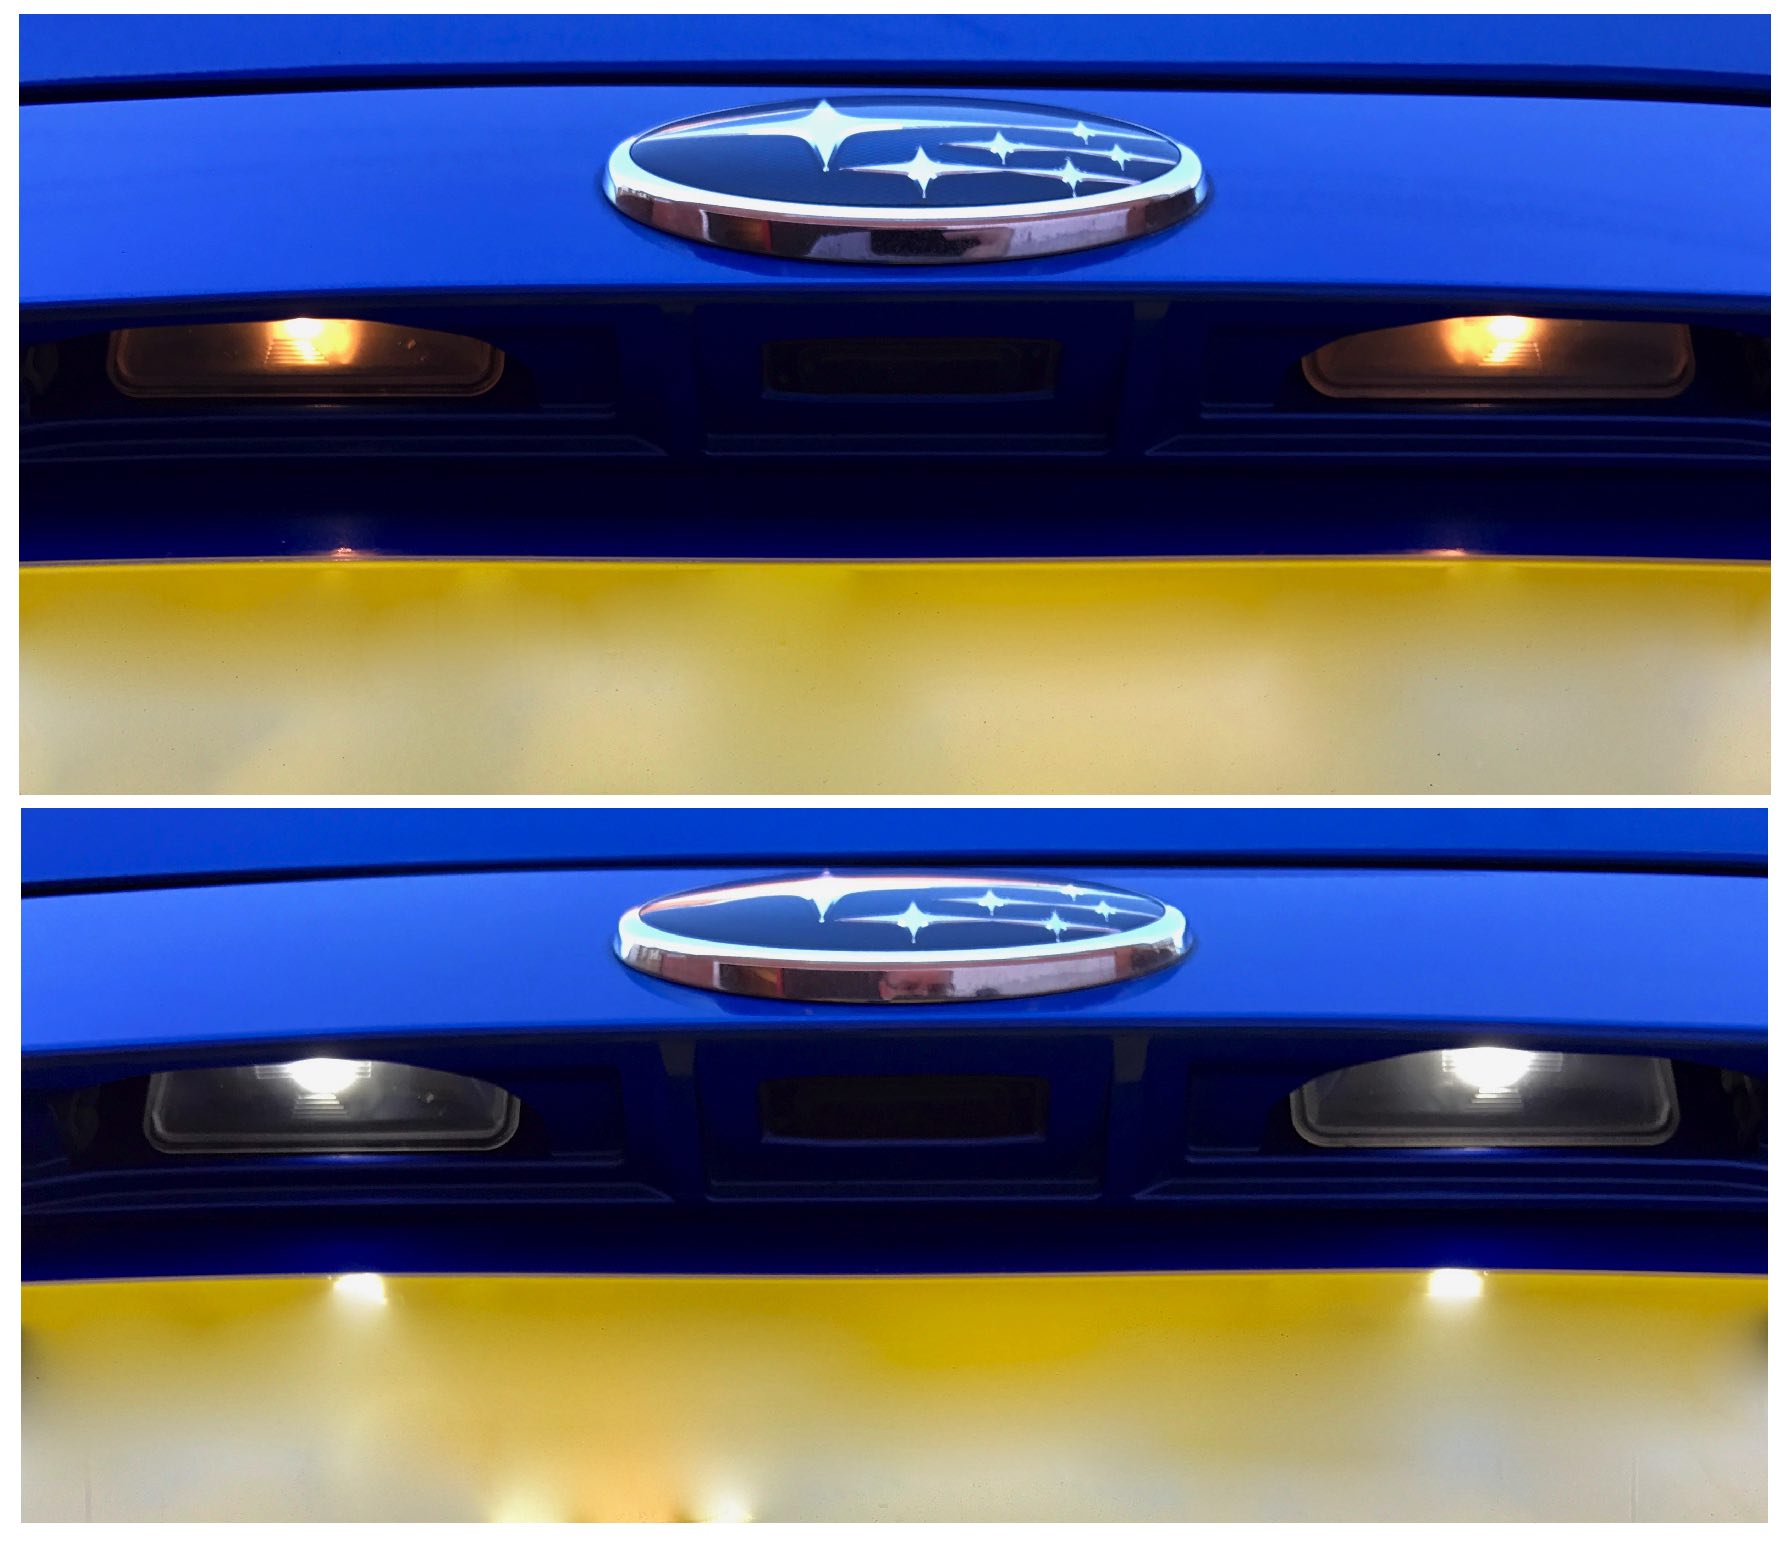
More bulb based fun! Filament is largely being purged from the BRZ, in its wake is LED goodness.

-
If you're polishing by hand, you'll struggle correct the paint, just get a glaze which will fill the imperfections, you'll save lots of elbow grease and achieve good looking results. Poorboys Black Hole is a good glaze. Stoner's Invisible Glass is simply superb on glass. Megs Endurance tyre gel is good, just use it sparingly to avoid sling. If you want a shampoo that not only cleans, but leaves behind protection, you can't beat Bathe+, just read what polished bliss have to say, they're very well respected. Protection can be achieved quickly and easily with Sonax Brilliant Shine Detailer, which, despite its name, is more of a sealant but easier to use.
Might be worth a read before you break out the chamois.
https://www.drbeasleys.com/blog/2012/03/16/why-chamois-are-a-sham/
-
Yeah, don't buy it all at once mate!
It's just bits and pieces I've sampled over the years!
-
I used to subscribe to Waxybox samples and with the myriad products I tried it was impossible to keep track of the wheat and chaff, so a list was born 📃📁🗄
😂
kaisersalsek reacted to this -
It's very personal, but for what it's worth hear a list of my own favourites.
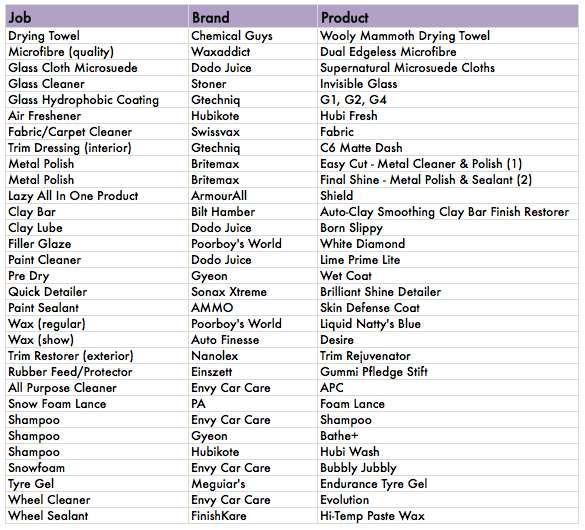
It's a little out of date as I've found a better drying towel - http://www.polishedbliss.co.uk/acatalog/gyeon-q2m-silk-dryers-cat5.html and I've replaced my decent MFs with these - http://www.polishedbliss.co.uk/acatalog/gyeon-q2m-polishwipe.html
kaisersalsek reacted to this -
35 minutes ago, Collateral said:Looks good.
Can I ask you to link the bulds you used?
That info would be great
")
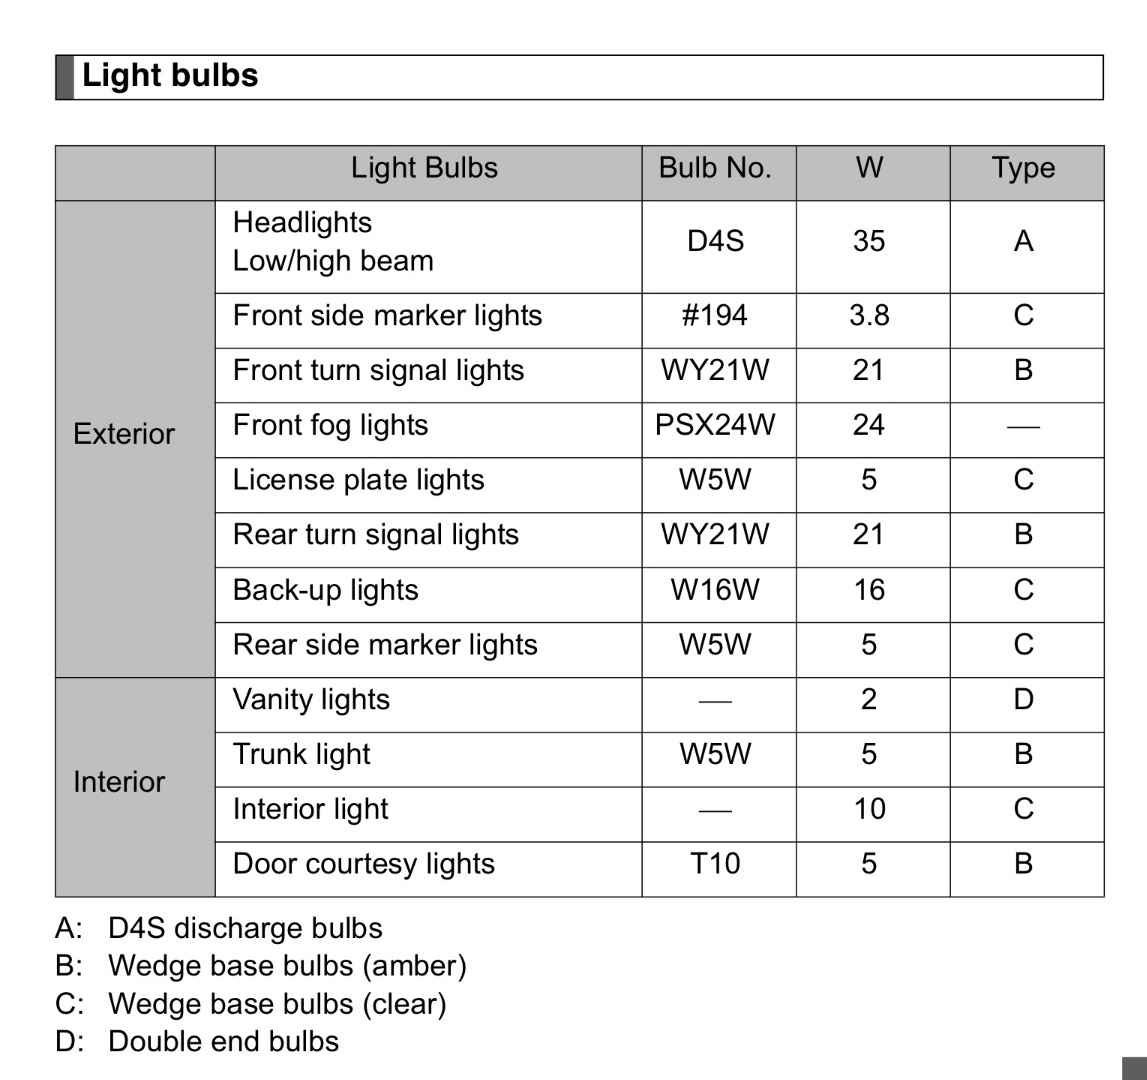
I've been working through a few bulbs recently, these are what I've fitted so far:
Front & Rear Indicators - Bulbs
http://www.hids-direct.co.uk/xtec-585-wy21w-chrome-amber-indicator-capless-wedge-bulbs/
Reverse - LEDs
https://www.amazon.co.uk/gp/product/B01LX8OQEN/ref=oh_aui_detailpage_o00_s00?ie=UTF8&psc=1
These are on order, I hope they will fit:
Boot Interior & Plate - LEDs
https://www.amazon.co.uk/dp/B00I798TKO/ref=pe_3187911_185740111_TE_item
List from the manual below:
 Collateral and benmmellor reacted to this
 -
Not had mine long but that feeling doesn't get old. Enjoy
-
1 hour ago, Foulsmell said:Yep. Read up well before you do it. I did mine with zero experience and as long as you choose products that are not too abrasive then you can't go wrong.
I'm not saying you can't, obviously you can. You could learn with a rotary on your own car, but for the sake of £10 you could experiment with all manner of pads and liquids, you could even wet sand it. All the while building confidence and knowledge.
Foulsmell reacted to this -
I wouldn't learn on my car, but a black bonnet from a scrappy can't be that hard to find!
Collateral reacted to this -
I paid more than £150 in Blackpool for a single stage correction, good luck in West London. If you wanna save the cash, you'd be better picking up a second hand DA and learning.
Collateral reacted to this -
6 minutes ago, Special K said:You carry paint in your GT86 boot? !!!!!!
I take the wife to Homebase and get her to walk it home ! It's only 17 miles . . .
And I bet she counts herself lucky you drive her there...
Rich and Cerastes reacted to this -
Thanks.
-
I assume they're M12 x 1.25 ?
-
Woohoo, thanks mate, I can get shopping!
-
The OEM nuts on my BRZ are in a right state, I've been wanting to replace them for something less beaten up but a number of the nuts I've been eyeing up have been labelled "only suitable for aftermarket wheels". I took this to be because of the angled edge of the bolt holes on aftermarket wheels, but, when the wheels were off today I noticed my existing nuts have a angled edge and the bolt holes on the wheels also sport an angled recess.
Does this mean I'm OK to fit aftermarket nuts on OEM wheels? Or have I misunderstood?
Thanks
.thumb.jpg.07b9ae93557face4a09c90495956637f.jpg)
-
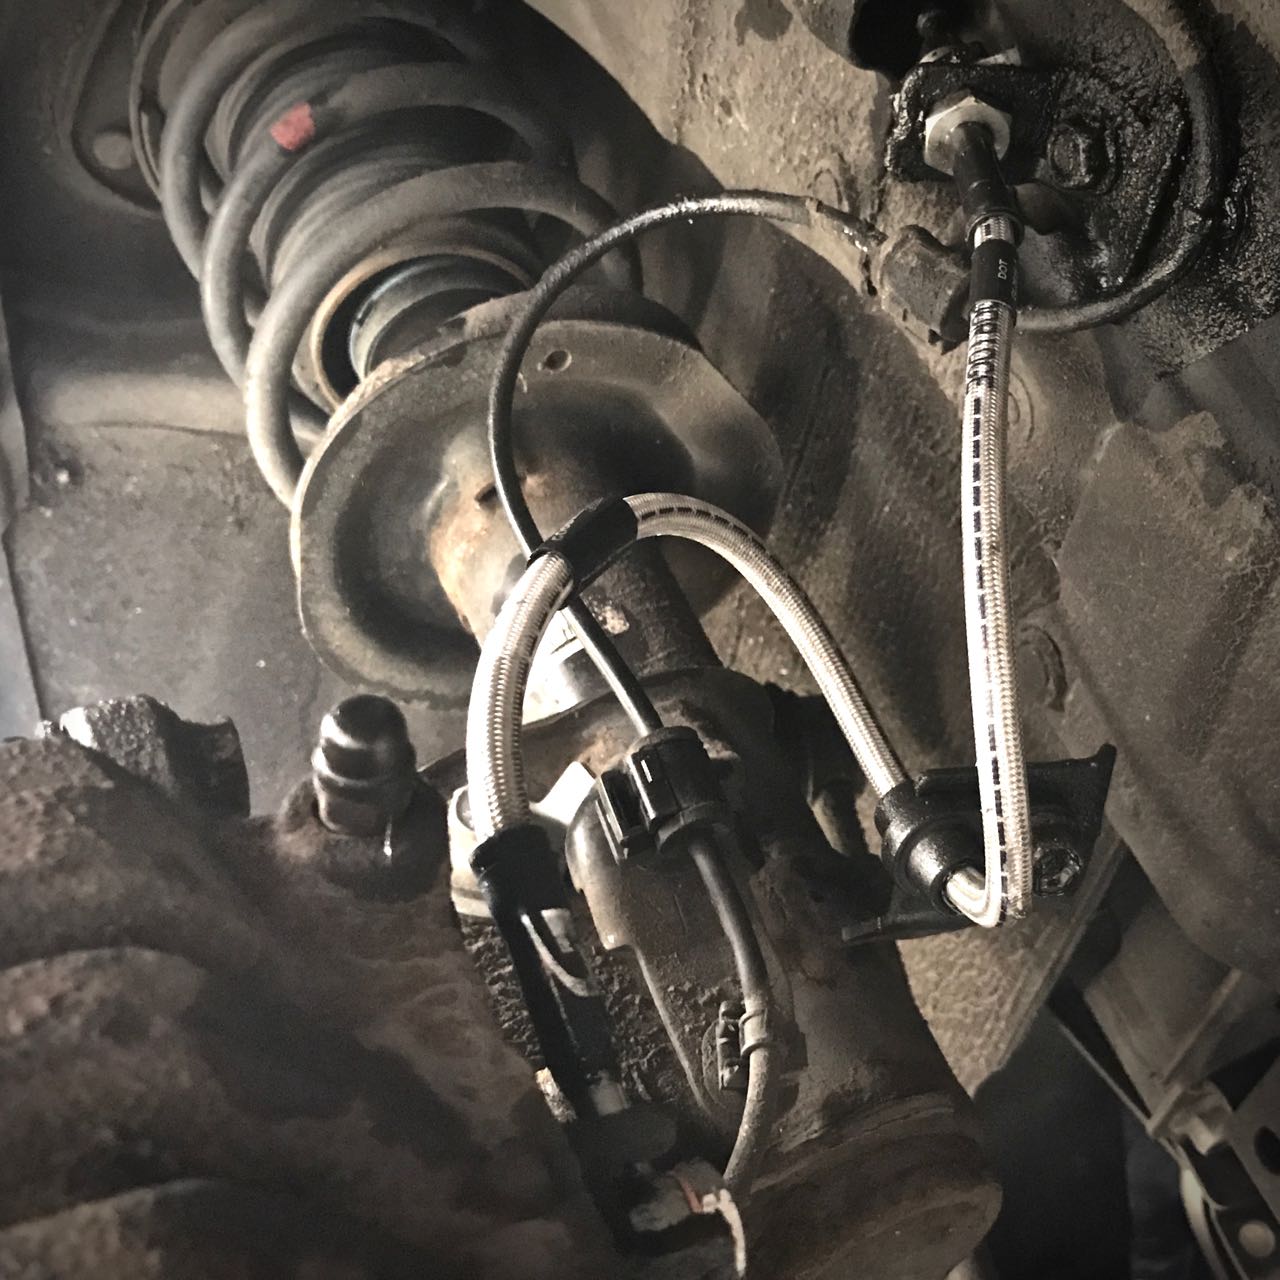
Essential maintenance this time, none of your frivolous modding rubbish
New Stoptech pads and Goodridge SS lines all round. I don't know what pad combo the PO was running but I wasn't impressed by the bite or how quickly they started to fade. Much happier today on the spirited ride home. Looking at the good condition of the lines which came off, I suspect the pads have more to do with the performance improvement than anything else. Very pleased.

I also took the yolks out of the fried eggs, front and back. i did try LEDs first but they weren't kicking out the light output I was expecting, so they'll do as spares.

No pics but I also had some camber bolts fitted up front, a geo and a super pro gearbox mount insert fItted. This last bit of maintenance has raised a small buzz in the cockpit, nothing noticeable with the tunes on, but has tightened up shifting nicely.
All in all some pleasing maintenance making her feel just that little bit sharper all around.
Collateral reacted to this -
I grabbed my net from my 350Z before I sold it, it was a genuine Nissan one, they're easy to find. It's a good size but it's a touch too wide due to the folds in the BRZ boot liner. If I was doing it again I'd either get a slightly narrower one and make sure the fixtures were only in the central flat section of the boot liner, not on the "wings", or I'd get a huge one and fix it to the boot sides, not floor.
I got the fixtures here http://www.ebay.co.uk/itm/162104586927?euid=e708ff693d7242158fa88a741e14b6d6&bu=44206756016&cp=1&sojTags=bu=bu
They took a bloody age to ship though as I failed to notice they were coming from the other side of the planet. The self tapers are sharp and will protrude through the bottom of the boot liner, so either dremmel them down after installation or put something on them to cap the sharp tips.
-
That's sound financial planning 👍🏼
I've softened my stance a little, I'm allowing myself some rice mods under the bonnet.
-
10 hours ago, gazza82 said:Hence the green caps ... then again it was ATS ...
Who was the chain reported to be telling customers it was N, and charging extra, but in reality it was common or garden compressed air?
They could fill them with Guinness and there'd be no excuse for those green caps!
Common or garden air is circa 80% nitrogen so they fill them with nitrogen in the same way a sausage is filled with meat 😂
-
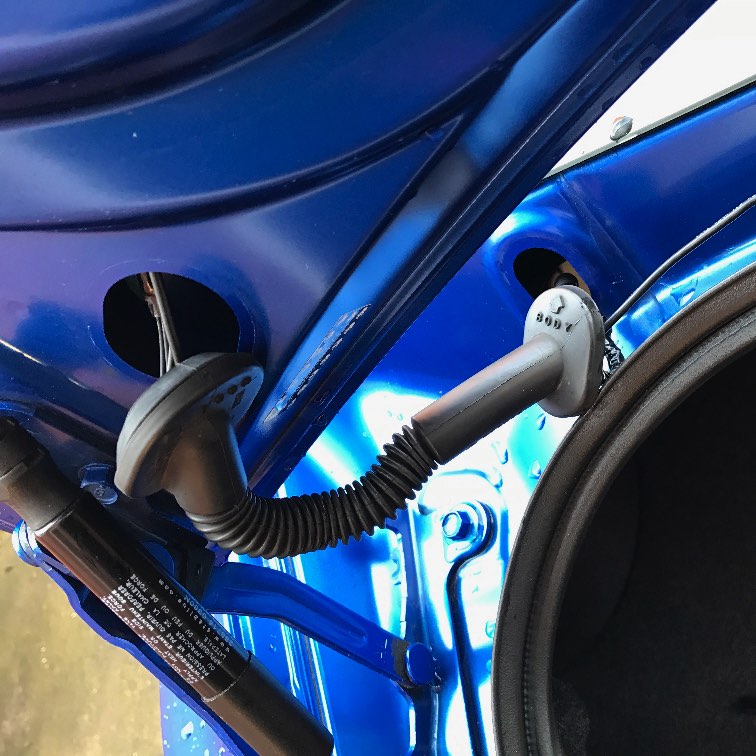
4 hours ago, benmmellor said:can I ask what rear view camera kit you have and how hard was it to fit? need to think about protecting my TRD rear!
Here's the camera https://www.caraudiocentre.co.uk/product_m-audiovox-rvc1_p-31209.htm it's a bit more expensive than I've paid for them in the past but it was just easy because I was getting a head unit from them also.
Fitting is straightforward but a little time consuming, obviously you have to run cable behind the dash, down the passenger side (front and rear) behind the trim and up into the boot. I was also replacing the head unit so I had the necessary adapters and cabling to tap straight in, I don't know how easy it is to retrofit to the OEM head unit.
The two tricky bits are getting the wire down the rubber from the boot lid to the body, here

and tapping the reverse light for power from here
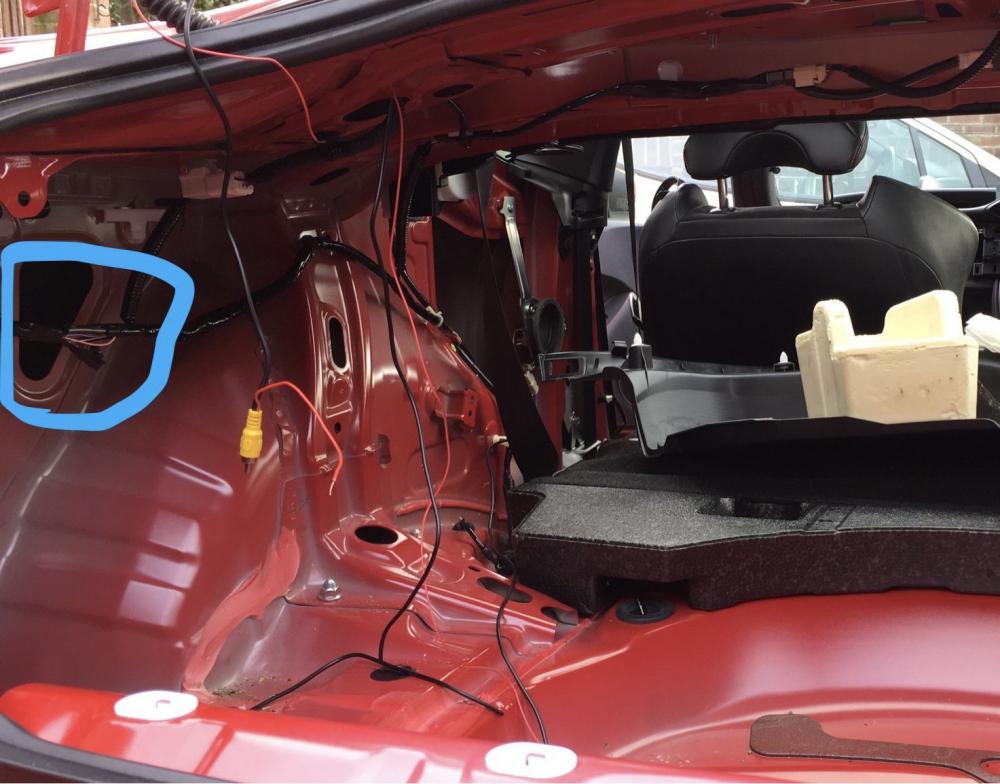
it's the pink wire. This last bit is tricky because the loom is very tightly packed, individual wires are quite thin and fragile and it involves working on your back, in the boot and stripping the cable insulation off without cutting the wire.
I believe you can get the reverse signal up from behind the head unit, but I didn't have that guide and you will still need to run a cable to the camera for signal and power to the back. Here's some links I found useful for cable routing and ideas.
http://www.gt86ownersclub.co.uk/forum/tomtop-white-reversing-camera-install_topic2800.html
http://forum.gt86drivers.de/index.php?page=Thread&threadID=1110
http://www.ft86club.com/forums/showthread.php?t=30144
It's not what I'd call skilled work, just be patient and careful. Check your wires with a multimeter before splicing/soldering anything. Stay safe. This is all for info, if you electrocute yourself or chop your loom in half I won't be held liable 😆
Keethos reacted to this -
7 minutes ago, gazza82 said:Did ATS fill them with Nitrogen .. or just run out of black caps??
They told me it was nitrogen
#racecar
Sighe98 reacted to this -
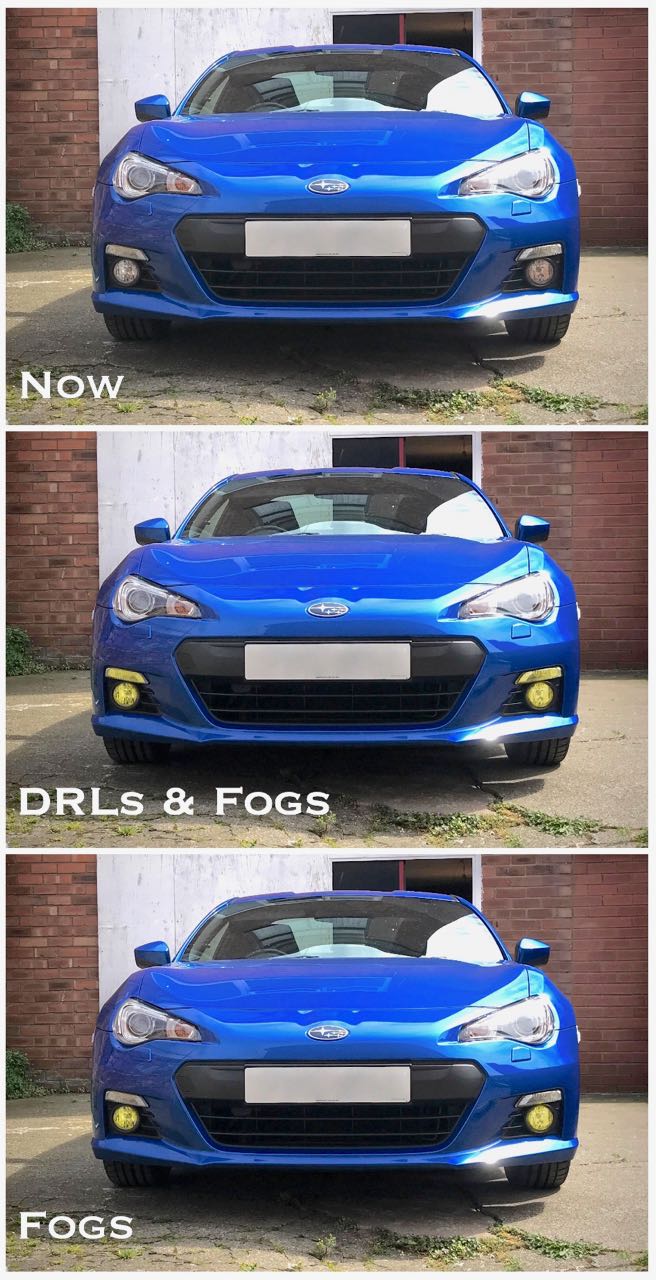
I also quite fancy adding a splash of colour and blue and yellow are natural bedfellows. What do you think?
-
A little bit of maintenance and a cheeky cosmetic mod.
Firstly the car came with some Apollo Aspire 4Gs on the front axle, I wasn't blow away by their wet performance and they seemed to lose pressure for fun, so I decided to treat her right and put some lovely fresh rubber on all round. I must apologise for the green dust caps, apparently ATS think that's an ok thing to do.

I ran the MPSS on my 350z but as they are being consigned to history I decided to try these instead. So far so good and I can confirm there is definitely no more release agent on the rears
On to more frivolous pursuits, I've had my pipe blocked for some time now (ooohh and indeed errr) so it felt right to do away with this lot and add some lightness.

Everything still runs fine, so I guess it really doesn't do anything other than make a noise. I was just going to leave a hole in the intake pipe and just run the car like a boss, but in the end I decided to add even more lightness and some purple too.

Just need to find some more purple...
PS - Anyone else found the Samco intake pipe to be a bit of PITA to fit? It just didn't want to play with the airbox end, so I swore at it until it did.
GT-Eighty-Chris reacted to this
.jpg.fe2f0c0ca4c29bbe56d15baa8dc80391.jpg)
.jpg.3bfeb0c0804d6613ed69313c87e50d9c.jpg)


.jpg.33bcba605e8baec7f375d37dd204e935.jpg)

Stubaru BRZ
in Projects & Builds
Posted · Report reply
Thanks mate.
I did wrap them, mainly in case I didn't like it. If it fails/fades, which is possible with my wrap skillz, I'll do it with paint/tint next time.