
will300
-
Content Count
1428 -
Joined
-
Last visited
-
Days Won
53
Everything posted by will300
-
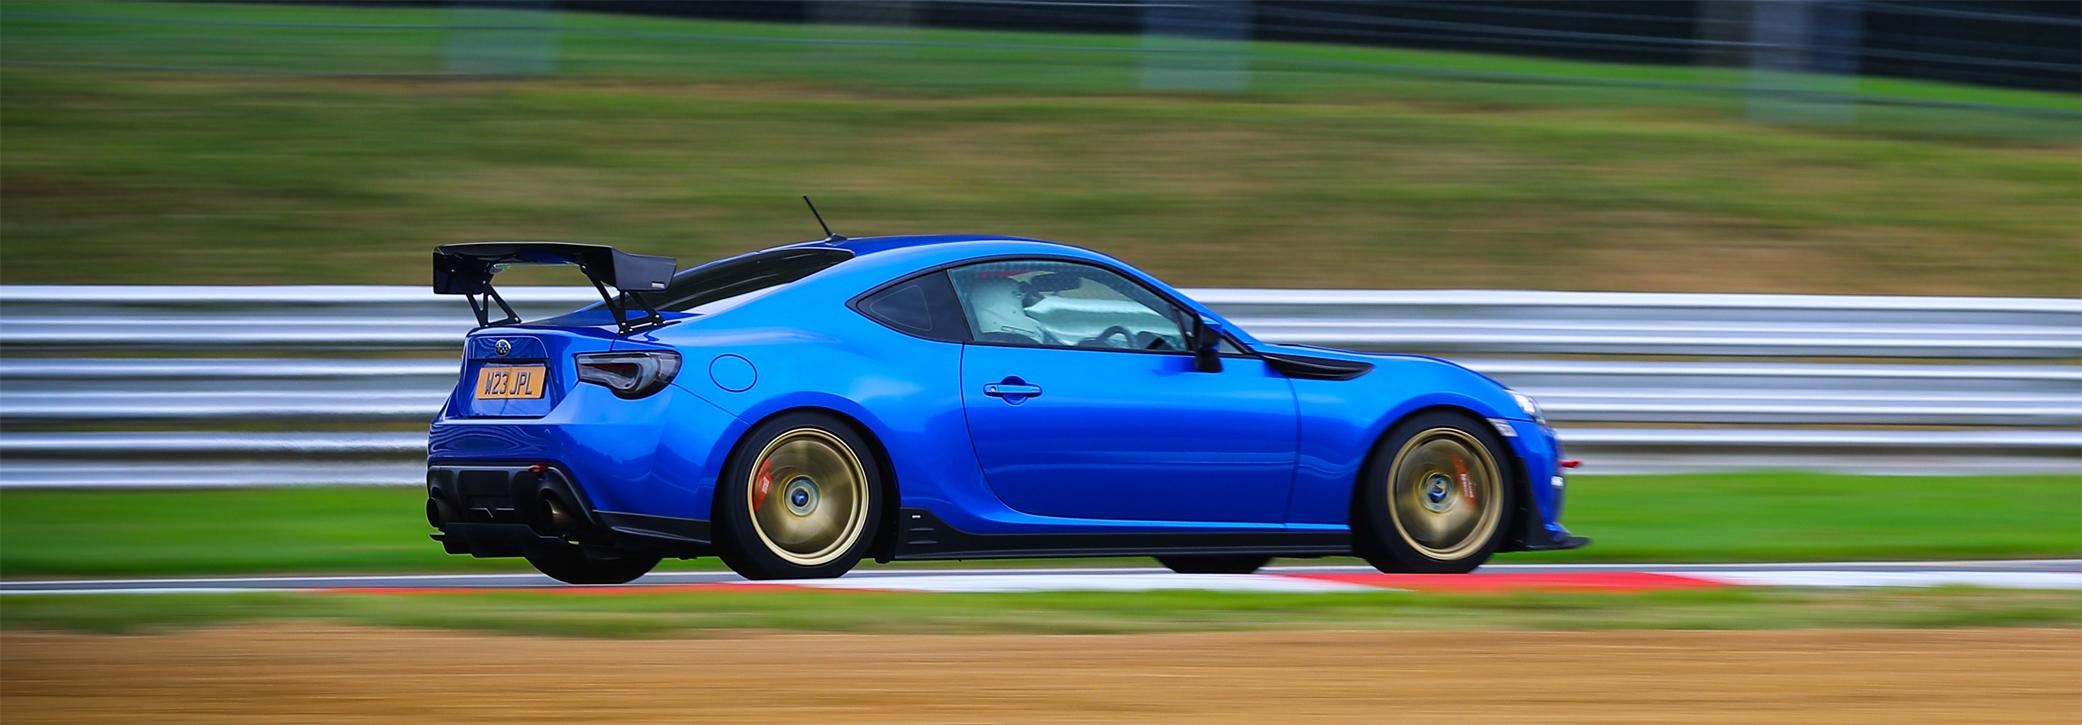
Myself & @Deacon meet up today to perform some quick noise tests and get a couple of videos of the new exhaust. Here is some DB readings from the exhaust - These are measured using a proper decibel meter, however there will be some variation due to wind noise and other vehicles. Static 1m Away - Center of Exhaust: 101.5db Peak / Blip 90.4db stable at 4.5k 63db warm idle Static 1m Away - Side of the car: 91.3db Peak / Blip 80db stable at 4.5k Drive by - Near (Curbside): Normal cars: 70-85db BRZ: 88db BRZ: 3rd-2nd downshift: 91.9bb Drive by - Far (1 lane from curbside): Normal cars: 70db BRZ: 79db BRZ: 83db at constant high revs 6-6.5k RPM BRZ - 2nd-3rd up shift: 92.6db Inside: Cabin windows down up to 7k RPM: 86.2 db Cabin windows up to 5.5k RPM: 84.2db Normal cruising windows down: 73db Normal cruising windows up: 72db These seem like decent readings for a catless manifold, 200cell race cat and 2.5" exhaust. The static and drive by decibel readings should be fine for Bedford Autodrome, however the peak on gear change could cause an issue. The readings were taken relativity close to the roadside and the noise meters at Bedford are a couple of meters away from the track, which should hopefully help. Here's a couple of on-board videos - the microphone is attached to the rear number plate. Through the rev range: Normal driving - between 50 & 60mph:
-
Update: 08/09/18 - End of year track prep Twelve months ago myself and a few others did a couple of track days in August, of which two of those days were at Bedford Autodrome. Unfortunately the 2nd time at Bedford got cut short due to my car being black flagged for noise, at the time my exhaust consisted of ACE Manifold & AVO Non-Res Catback (More about this can be read here: http://www.gt86.org.uk/forums/topic/4097-will300s-subaru-brz-build/?page=3&tab=comments#comment-88143) Anyway earlier this year I decided to remove my AVO exhaust and replace it with the standard cat back. The plan was to then get a track friendly custom exhaust made up over the next couple of months. Unfortunately various issue's happened over the next 6 months which meant this never happened. Come August I realised my car needed its 5th year service, plus I'd ordered various parts which also needed fitting in preparation for the next lot of track days. I therefore decide to get everything done a the same time and finally get the custom exhaust I wanted made up. After a couple of phone calls to various place, I decided to go with a very busy specialist who could fit all the parts, service the car and make an exhaust to match my requirements. My exhaust requirements consisted off: 2.5" Catback with a Y pipe design 2 separate back boxes A large center resonator Catted front pipe with a 200cell race cat and a resonator. Track friendly - Most important bit Interestingly the specialist had a similar design already planned for their own car. The car was then booked in and after 3 weeks the car was ready for collection. Here's the list of upgrades that have been installed. Engine and Exhaust: Custom 2.5" Front cat pipe with Resonator Custom 2.5" Resonated Catback exhaust Hel Oil Cooler SPA Design - Oil Temp & Oil Pressure Gauge (Block8Head guage holder) Cosworth Sump baffle Cusco Sump plug HEL Performance braided clutch line STi Engine Mounts Exterior: Verus Engineering Race Splitter with end plates Future modifications - I planned on getting these installed with the above, but due to various reason I changed my mind: Verus Engineering Bonnet vents STi Rear Brembo's As you can see from the upgrades I had fitted alot of these will help benefit the car when on track. This should mean I can run longer stints without the car over heating. Unfortunately most of these modifications are hidden away in the engine bay, so there are no pretty pictures. However here are some photo's of the exhaust system I had made up. I'll also get some updated photo's of the car in a couple of weeks. I'm planning on meeting with @Deacon over the next couple of days to sound test the exhaust and possibly get a couple of videos, so expect another update soon.
-
@Lowe, I'm now planning on going to this. However its probably not a good idea when I've got no money and the RTX 2080Ti has just come out.
-
No, you won't be able to combine a TD mid pipe to a cobra back box (muffler). Why don't you just get a TD resonated system? Here's a couple of photo's showing the difference (I've highlighted the join so you can see it's physically different): Cobra Exhaust: Tuning Developments Exhaust:
-
You'd be better off asking for advise on FT86Club, here: http://www.ft86club.com/forums/forumdisplay.php?s=49953a020aacfaaeec8293a60d67b503&f=88 As this is predominantly a UK owners forum, no-one will have any experience with the OFT tablet as we all use EcuTek.
-
@Deacon that's a bloody brilliant comparison.
-
I managed to get a place on the Hyundai driving experience for the i30N, I'm hoping it'll be a good day out not a 5 minute test drive. (https://nthdegree.hyundai.co.uk/)
-
Welcome @Tristor, looks like you've got a really good setup there. Lauren, the AP Sprint kit that Tristor is running a completely different type of caliper to ours.
-
It's probably been digitally recorded by Toyota, you can check here: https://www.toyota.com/owners/parts-service/history
-
These guy have them in stock apparently: https://www.bassjunkies.com/is165toy.html Sent from my Pixel using Tapatalk
-
That's not entirely correct, you need to modify the crash bar.
-
I gently pulled it, and used a sharp knife to cut the adhesive. The first door picture shows how far down I pulled it down, you don't need to remove it. Once I finished the sound deadening I simply pushed it back into place, rubbing the adhesive with my finger. The current temperature helps as it means the adhesive is really soft and stretchy.
-
I think it was this: https://www.amazon.co.uk/Polyester-Compressible-Proofing-Insulation-Material/dp/B0793SFTSK/ but in a 10m x 1m size.
-
Fitting the Focal tweeters and sound deadening the boot was my task for today. I'll see how the car sounds over the next week for road noise, and test out the newly installed Focal speakers. The next big job on the list is to deaden the floor and under the rear seats, however that'll have to wait until I have a free weekend. Quick notes on the Focal speakers: I ran one of the Focal speaker for two weeks, as I started the drivers door late on sunday and due to the MLV not fitting on the door card I gave up doing anything else. There is a decent jump in quality that quite distinguishable between the stock units and Focals. The quality of the speakers makes them worth the £££ alone. However I'll see how I get on over the next week and report back.
-
Next up was the boot and boot lid. Silent Coat applied Boot lid Using up the last of the absorber foam:
-
During the following week I read about EB2429 install, on the owners club (http://www.gt86ownersclub.co.uk/forum/focal-speakers-and-sound-deadening_topic15043.html), he suggested using Silent Coat absorber foam for the door cards. So I binned the MLV idea of and went on Amazon and bought some absorber foam. This was much easier to cut to shape and it has a sticky back so was alot less fiddly to apply. Applied to door card Here are a couple of pictures of the Focal speakers (and a couple with the stock units) Side by side comparison - Stock on the left, Focal on the right. The focal tweeter come with a plug and play adapter that pushes on the end of the tweeter cable The focal tweeters don't click into place like the stock units as they are slightly taller, however the fit is tight so they won't go anywhere. Stock tweeter
-
The parcel shelf got some attention, I cut up a Silent Coat tile and applied it over various parts of the shelf: I added some of the insulation material to the lid Next was to start one of the doors - Door cover removed: Silent Coat tiles applied Knowing that I was going to sound proof the doors, I thought it best whilst on Amazon to pick up a set of Focal IS165TOY speakers. I installed these at the same time. All ready for the door card to go back on The guide on FT86forum suggested to add some MLV to the door cards, so I cut some to shape However it turned out this was a waste of time as I couldn't get the door card to fit back on, after around 45minutes of felting and re-cutting the MLV, I gave up. It was late in the day and I need the car back together for work the following day.
-
Over the last few weekends I decide to start a new project on the BRZ, sound deadening. Recently during the last 6 months I've started to get feed up of the amount of road noise that gets feed into the cabin. So in an attempt to tackle this I did some research on the various 86 forums and came across the following guide: http://www.ft86club.com/forums/showthread.php?t=53511. Using that guide as a base I bought some sound deadening materials from Amazon and went about installing it all. Materials used: Silent Coat tiles - https://www.amazon.co.uk/Silent-Coat-187x265mm-Deadening-Proofing/dp/B00NVE013I/ Dodo Pro Barrier MLV - https://www.amazon.co.uk/Dodo-Mat-Barrier-Proofing-Camper/dp/B00LUOQWDY/ Silent Coat absorber foam: https://www.amazon.co.uk/Silent-Coat-Sound-Absorber-Proofing/dp/B00CV0BM0O/ Sound deadening insulation Over the next couple of posts will be various pictures of the install. I decided to start with one of the most difficult jobs of the lot, the roof. Followed by the rear wheel arches. Roof Install - Headlining removed Silent Coat tiles added Additional sound deadening insulation material Head lining re-installed. Rear Wheel Arches: Silent Coat tiles applied Sound deadening insulation material filling the remaining gap Dodomat Pro MLV added to rear quarter panels This has definitely helped as it moved the noise from the back of the cabin more towards the front, it's still to noisy though, on the next step.
-
That's me, however the white stripes have now gone.
-
Welcome to the forum dude. I was fairly sure when I saw the 2nd picture that I recogised your car, sure enough I scroll back up and see your location and it confirmed my suspicions. I'm the WR Blue BRZ owner in Lichfield.
-
Been a while since my last update, nothing has changed performance wise. However today I picked my car up from being detailed by Reep Midlands in Leicester. Car now has PPF applied to the front bumper, along with a couple of pieces on the rear bumper. G-Techniq Crystal Serum Ultra Black applied everywhere else. I also had the engine bay cleaned and front brake calipers sealed. I ordered some new wheels a month or some ago, they are Japan Racing JR29's in Bronze, size: 17x8 +35. Fitted with Michelin PS4's. Also fitted a new Yuasa 60Ah battery as the standard 48Ah one died on me. Here are a couple of photo's.
-
Which companies did you go to?
-
Jesus @Deacon you didn't say they went into that much detail
-
Event Title: Midlands Breakfast Mini Meet - Coventry Motofest Event Author: will300 Event Date: 02.06.2018 Hello Everyone Myself and @Keethos will be meeting up on Saturday 2nd June, in Coventry for the Coventry Motofest. We'll be having breakfast at the Toby Carvery in Coventry before heading into the main part of the city center. Everyone is welcome to join us for a breakfast mini meet. The Toby Cavery is located on Brinklow Road in Coventry just off the A46, so easy to find. There is plenty of car parking space and however being MotoFest weekend it could be busy, so please bare that in-mind. Also for those that haven't been to a Toby Cavery before its an all you can eat breakfast, for £6 with unlimited tea and coffee. Thanks for looking, Will Location & Time: Toby Cavery Brinklow Road Coventry West Midlands CV3 2DS Date: 2nd June From: 9am Midlands Breakfast Mini Meet - Coventry Motofest
-
Hello Everyone Myself and @Keethos will be meeting up on Saturday 2nd June, in Coventry for the Coventry Motofest. We'll be having breakfast at the Toby Carvery in Coventry before heading into the main part of the city center. Everyone is welcome to join us for a breakfast mini meet. The Toby Cavery is located on Brinklow Road in Coventry just off the A46, so easy to find. There is plenty of car parking space and however being MotoFest weekend it could be busy, so please bare that in-mind. Also for those that haven't been to a Toby Cavery before its an all you can eat breakfast, for £6 with unlimited tea and coffee. Thanks for looking, Will Location & Time: Toby Cavery Brinklow Road Coventry West Midlands CV3 2DS Date: 2nd June From: 9am