
Tweedbean
-
Content Count
467 -
Joined
-
Last visited
-
Days Won
9
Reputation Activity
-

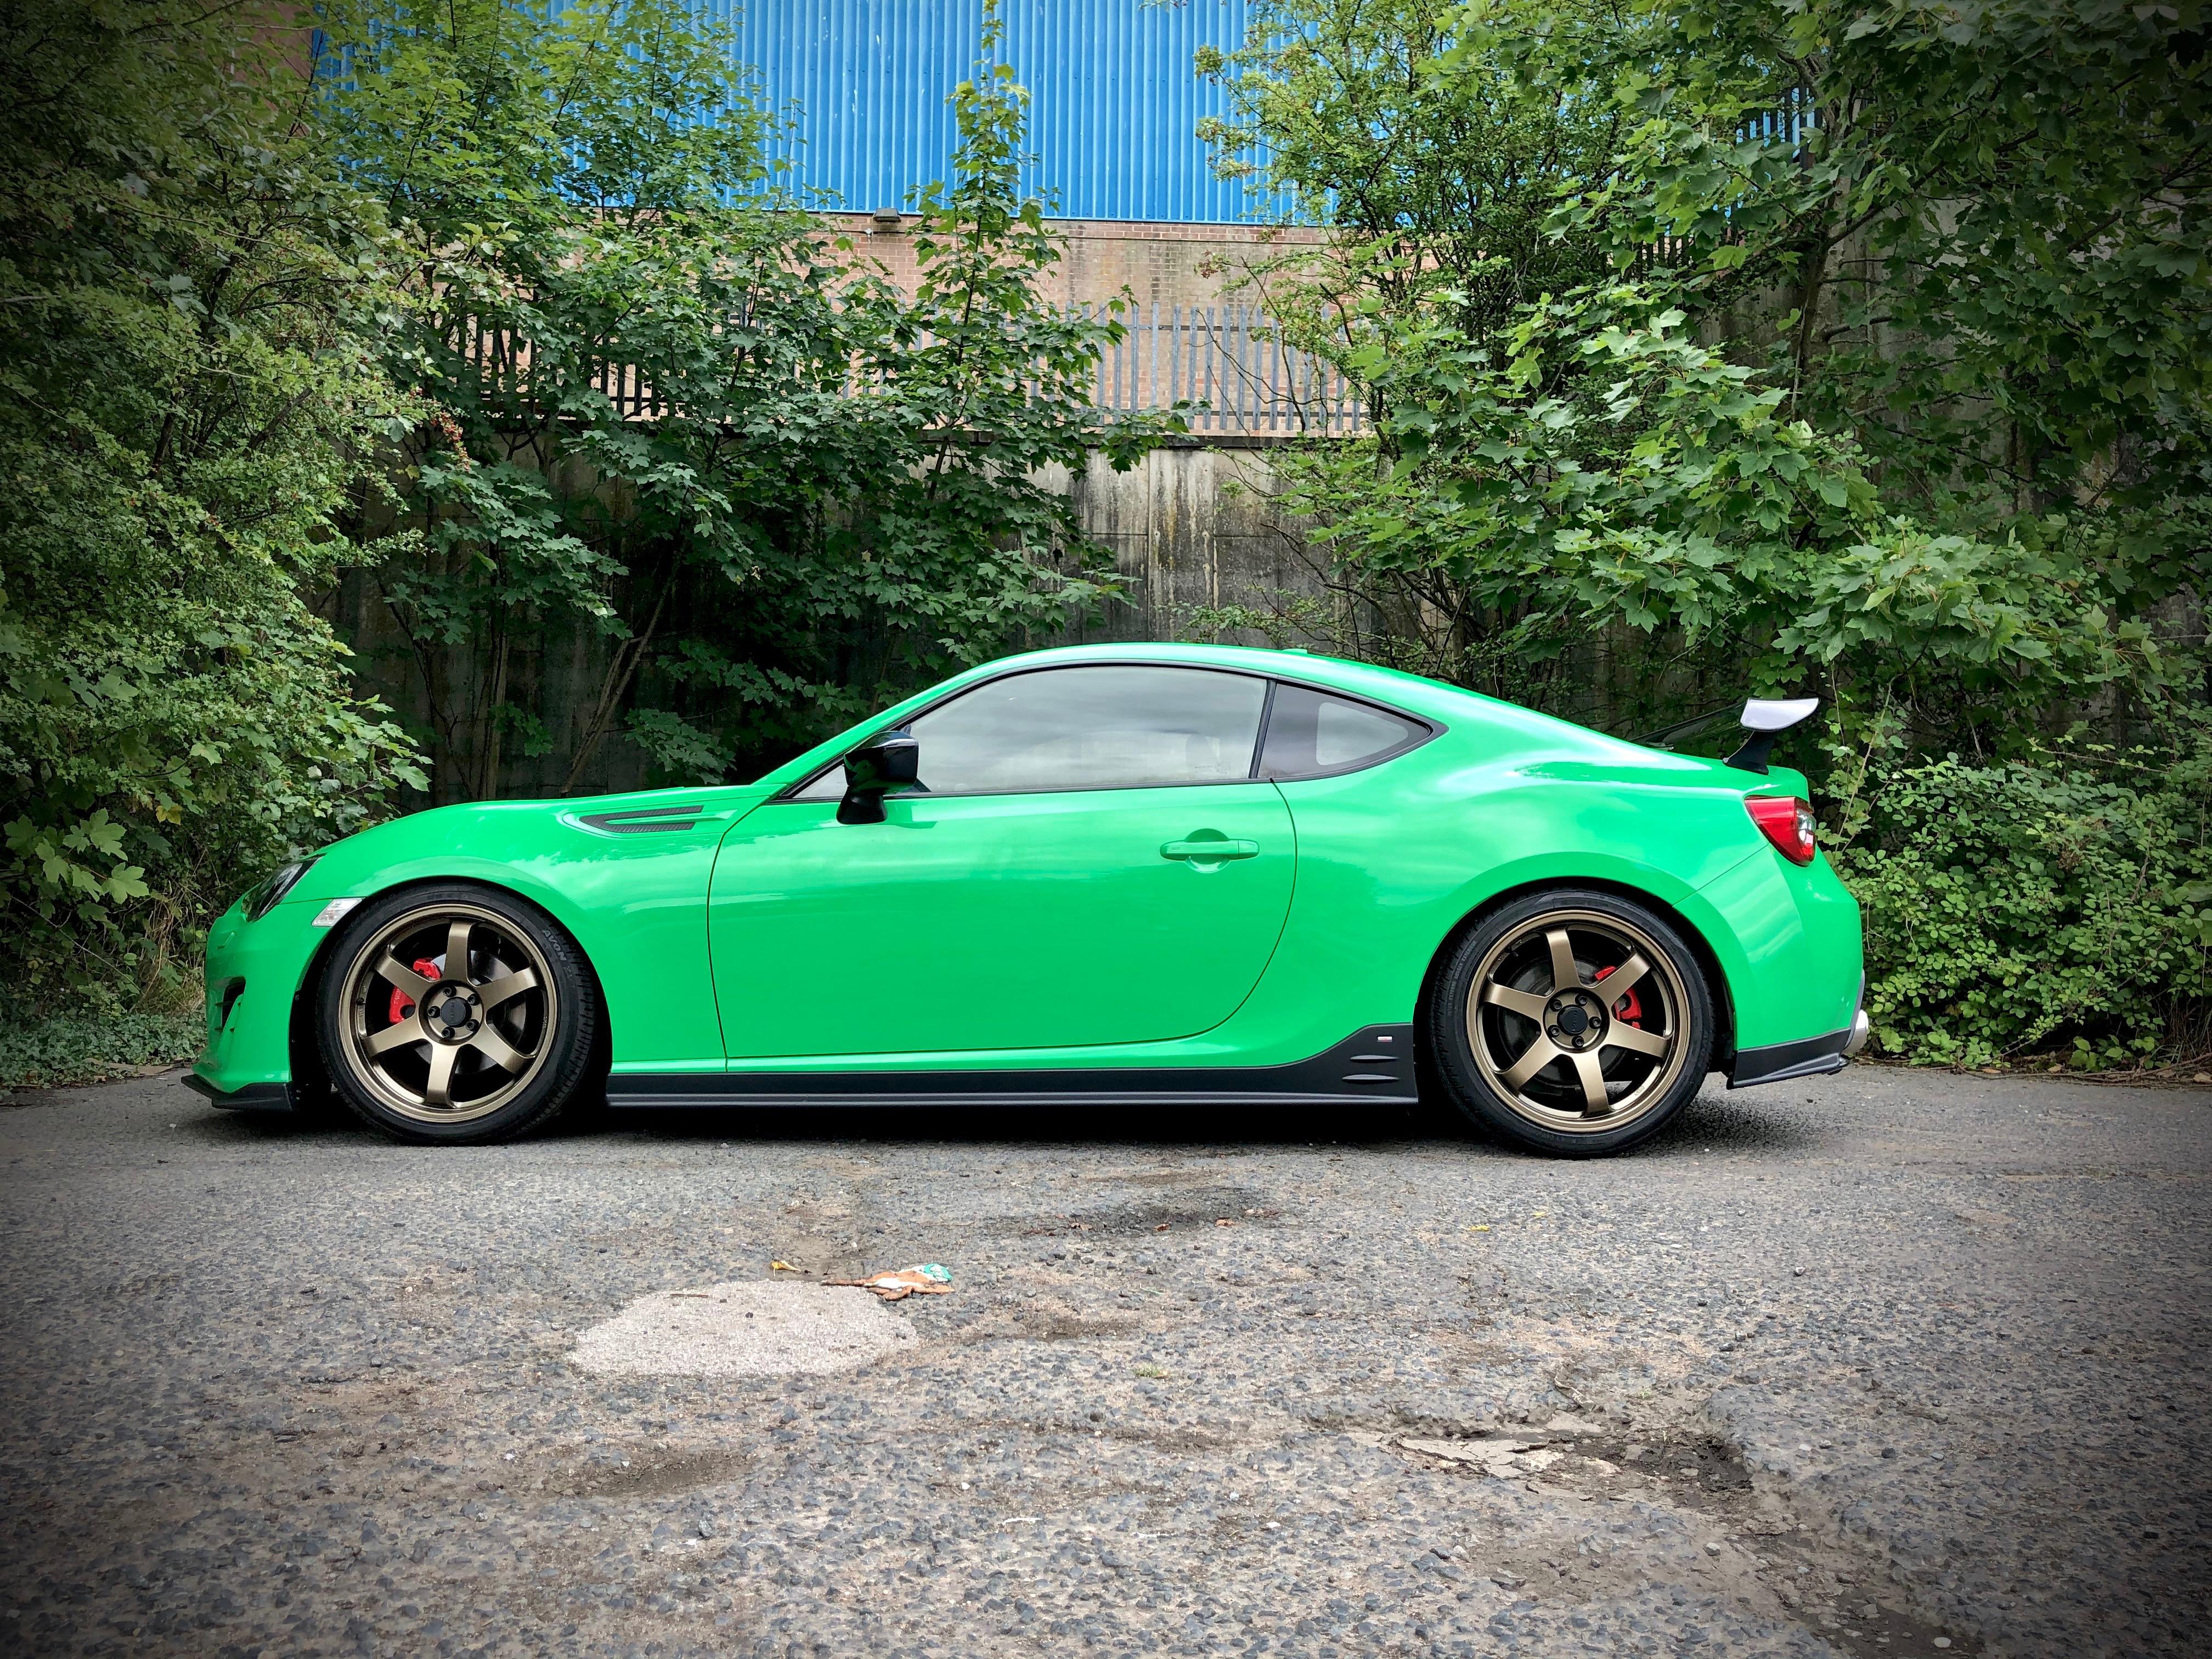
 Tweedbean got a reaction from Lauren in tweedbean's Porsche RS Green BRZ Build
Day 78 - I finally legally own the BRZ
After 78 days of waiting the V5 finally turned up today which means its actually SORN'd and legally mine.
More parts arrived. Firstly suspension components, I went for Tein Flex Z as I wanted to stick with a Japanese made component where possible and I got a bargain on a brand new set that the owner never got chance to fit. He also had Whiteline droplinks which I also snapped up as no doubt the stock ones will need cutting off, which is a known issue.
Untitled by James Baker, on Flickr
Untitled by James Baker, on Flickr
I also removed all my silver interior trim before the car went off to paint so I could paint them myself matt black. Not a big fan of matching these to body colour so went for something simple. I sanded, primed, painted matt black then used matt lacquer for protection. I'm intersted to see how long they last, if the finish doesn't hold up, I will invest in some carbon parts but for now this was a simple and cheap fix.
Untitled by James Baker, on Flickr
Also an interesting package arrived from Japan, a flexible STI strut brace:
Untitled by James Baker, on Flickr
Unlike a conventional rigid brace, the flexible one is split and joined with pillow ball joints in the centre to be longitudinally mobile while helping laterally stiffen the body of the car. Here is some blurb from Subaru:
"Different from a rigid bar which is designed just to increase rigidity of the body of a car, the concept behind this bar is to constantly enhance traction of the wheels by strongly holding in a transverse direction at the same time as moderately handling the impact from the ground, in order to realize a ‘flexible yet elegant driving feel’.
As a result, responsiveness at the time of steering improves without compromising comfort, which allows the driver to actually feel that the car can turn as intended, and when they want to go straight, it provides a stable drive without too much impact from uneven road surfaces. As described, this product will further deepen your pleasure of driving."
https://www.sti.jp/en/parts/feature/flexibletowerbar.html
I will let you know how I get on with it, it came as a bundle with the other STi bits so I haven't lost anything by trying it.
-
 Tweedbean reacted to MartinT in tweedbean's Porsche RS Green BRZ Build
I enjoyed installing my STI front lip. My advice is to use an electric screwdriver and hex-base drill bits to drill the holes with easy control and slow speed. The fit is very good but the templates are not all correct for the facelift BRZ - double-check by offering up the lip and marking through its holes.
-
Tweedbean reacted to nerdstrike in tweedbean's Porsche RS Green BRZ Build
Lots of these bits look great. Is it going to be ok with matt skirts and glossy carbon finish on the wing?
-
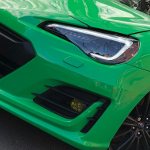
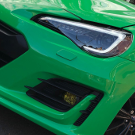
 Tweedbean got a reaction from Stutopia in tweedbean's Porsche RS Green BRZ Build
Day 77
More parts from Japan, this time a full STI kit including front lip, sideskirts and rear bumper trims. All finished in a satin/matt black finish and will be fitted as they are. Glad I went for the genuine bits over rep parts as they should fit no issue, even if they hit my wallet hard:
Side Skirts
STI BRZ Parts by James Baker, on Flickr
Front Lip
STI BRZ Parts by James Baker, on Flickr
Rear Bumper Trim
STI BRZ Parts by James Baker, on Flickr
I also have black controls so I can remove the silver ones to work better with my theme:
STI BRZ Parts by James Baker, on Flickr
-
Tweedbean reacted to GT86Curn in GT86Curn's Facelift build
Hi All,
Picked up my facelift black 86 around a month ago from Cheltenham (Im based in Swindon). Here are photos from the listing:
I bought it from a Toyota dealership knowing it had a couple of decent modifications. Spec when I bought it was is:
Miltek unresinated cat back
Fensport remap
Summit racing strut brace
I recently fit a Sard carbon intake pipe (What a work of art!)
I then fit some Focal direct fit front speakers. My last 86 had the JBL system in it so i really did feel the standard system was lacking
And thats it up to date at the moment.
On order I currently have a set of 17" Wedssport wheels and next Friday Im booked in to TD for the NA package with UEL manifold and some lowering springs. Ill update when I have more progress!
-
Tweedbean reacted to 3782mc in Deacons '86
Yes my experience with FedEx (and most couriers) has been the same, I normally just got with JapanPost for that reason in which case RM or Parcelforce handle the charges and they tend to be pretty accurate with the calculations.
-
 Tweedbean reacted to James18 in Deacons '86
My FedEx bill was post delivery. And was seemingly a random figure plucked out of their arse 😆👍🏼
-
-
Tweedbean reacted to Deacon in Deacons '86
Mine didn't come via FedEx so I'm not sure sorry.
Most of the stuff I've ordered from Japan in the past has been pre delivery but I did once have something where the bill didn't appear until almost a month later!
-
 Tweedbean got a reaction from BRZ-123 in tweedbean's Porsche RS Green BRZ Build
Day 68 - Things are moving along nicely
So yesterday I gutted the dash so I can get the trim painted by the bodyshop to match the exterior and all the grey trim rings etc will be going matt black:
Untitled by James Baker, on Flickr
This morning I dropped the BRZ off at the bodyshop for its respray, cant wait to see the new colour on it. I've asked for progress photos throughout so I can keep you all up to date.
Untitled by James Baker, on Flickr
I also test fitted the Grids on the car, just to check they actually were 5x100
before I get them refurbed. Note coilovers will be ordered come pay day to reduce that wheel gap.
Untitled by James Baker, on Flickr
Untitled by James Baker, on Flickr
I also used my day off today to take a trip to City Wheel Refurbishment to drop the Rota's off for a full refurb. Going for a matt finish, for the first time from them, I've always gone gloss from them.
Untitled by James Baker, on Flickr
My plans are starting to come together now, its just a shame I still dont have the V5 due to Covid closing down half of the DVLA, 68 days a counting since they received the paperwork.
-
Tweedbean reacted to SiCaln in tweedbean's Porsche RS Green BRZ Build
Great work mate, ticking off all my plans, assume the new cluster didn't adjust to your odometer reading, are you gonna get that adjusted?
-
Tweedbean reacted to nerdstrike in Removing the instrument binnacle cover visor Step By Step Video
How simple!
-
 Tweedbean got a reaction from Deacon in Deacons '86
Thanks I've just placed my order the the STI lip kit all round and some JDM interior parts. Fingers crossed
-
Tweedbean reacted to Deacon in Deacons '86
I got them from Japanparts and they took just under three weeks from ordering to being delivered to me.
-
Tweedbean got a reaction from Lauren in tweedbean's Porsche RS Green BRZ Build
Day 61
Last week the BRZ arrived back via contactless delivery. Fully aligned and ready to go. Ignore the bonnet gap, the bonnet is open as I needed to fix the lock before I close it:
Untitled by James Baker, on Flickr
However my first job was to start stripping the front end back down so I could fit the rads/aircon/fans. Super easy job now I have done it multiple times.
Untitled by James Baker, on Flickr
My make shift painting station where I painted everything within the engine bay/front that had come from other cars or had come from Subaru in the black primer type finish.
Untitled by James Baker, on Flickr
I decided to go with matt black for a simple clean look. I will eventually do the entire engine bay in matt black as it will tie in with whichever colour I do the exterior and the engine isnt coming out for the respray so its easier for me to paint it matt black and get a decent finish. Hence why you can see paint under where the front wings will go.
Next I fitted the radiator/air con/fan assembly, I had to swap over the air con metal hoses as mine were also damaged from the crash. I then followed the correct process to fill/bleed/test the radiators with no signs of leaks:
Untitled by James Baker, on Flickr
This was a relief as it means I can move the car with no fear of damaging everything as this now means I have a running car. Idles perfectly, the engine seems good with no error codes which is a bonus.
Once that was done I set about bolting up the front end, fitting the crash beam, crash sensors etc and accounting for all the hanging connectors. All went back perfectly. I also refitted the airbox, snorkel and the surround that sits between the two. New items added to the list of bits to buy include the radiator filler bracket and a new filler neck for the washer reservoir:
Untitled by James Baker, on Flickr
Next I plumbed in the new washer reservoir which had been destroy in the crash. Check for leaks and all good. Now I need to order some washer jets for the headlights but other than that the washer system is now fully functional again:
Untitled by James Baker, on Flickr
Prep for paint
Fixing wise there isnt much left to do so the car can now go for paint, however I need to strip the car to keep costs down. So I stripped everything needed to get the car painted including:
Both wings Rear Lights Door Seals Window Seals Aerial Roof trim Wing Mirrors Kick Plates Door cards (I will replace weather seal plastic once painted) Untitled by James Baker, on Flickr
So the only things left that I need to do this week are the:
Rear Bumper Door Handles Then its ready for paint:
Untitled by James Baker, on Flickr
Untitled by James Baker, on Flick
Also my bonnet lifters arrived, they will go on the shelf to be fitted once the car has been painted as they will only have to come off again:
Untitled by James Baker, on Flickr
Also a courier today is collecting a Boral Unequal length manifold and a Milltek Overpipe that came up for sale at a great price. I fancy a bit of Scooby rumble from the boxer while I save up for forced induction.
Removing Exterior Door Handles
If anyone has any tips for doing this on a BRZ/GT86/FRS that have the touch sensors, please let me know. Only way I can see so far is to remove the glass to get to the connector to disconnect it. Its super easy for cars without this feature as its one torx headed bolt and you are done, not so simple on the UK spec cars with the touch sensors.
-
-
 Tweedbean reacted to spikyone in tweedbean's Porsche RS Green BRZ Build
Nice job on the wing brackets!
-
Tweedbean reacted to ThatGuyThere in Bringing an 86 back from the dead
There's a YouTuber called 'B is for build' and I remember him saying that he found the fitment and quality to be better on the replica than the genuine Rocket Bunny kit.
His series on the gt86 might be of interest to you.
-
 Tweedbean got a reaction from will300 in tweedbean's Porsche RS Green BRZ Build
Day 49
While the BRZ is away at the crash specialists, I decided to start work on the wing brackets. They weren't in the best visual condition, but it was all superficial:
Untitled by James Baker, on Flickr
- So I used a heat gun to remove the GT86 stickers.
- Followed by a light sand with fine grit to remove any minor surface imperfections or corrosion
- I then cleaned down with a panel prep spray and clean cloth
- I used a number of coats of grey primer
- Finally finished in matt black
Sard style wing part refresh by James Baker, on Flickr
I am looking into what protection a matt clear coat over the top would provide as not used it before.
Also had a photo from the crash specialist who are busy working away, they have the slam pane in place and are currently working out if everything else is straight. Once, done it can come back for me to paint the slam panel and get the rest ready for the bodyshop to paint it.
Slam panel is on by James Baker, on Flickr
-
Tweedbean reacted to Samwise in Bringing an 86 back from the dead
I would say the fit is okay but it's definitely not as clean as i'd have liked. I think alot of the value behind these kits is the style, the fact its from japan, etc rather than the quality but I think that goes without saying. Truthfully they're definitely no better than random other glass fibre parts/kits excluding copied parts which they are probably better than.
Yeah im definitely going to be doing that under the headlights, at this stage im just fitting the kit so that i know all the parts are on the car and fit correctly. When I go back around the car a second time to smooth out mating surfaces, fit my proper hardware, clearance where needed, etc then i'll address the gap under the headlights
-
Tweedbean got a reaction from Lauren in tweedbean's Porsche RS Green BRZ Build
Day 47: The repair process begins again.
So last week I had a contactless collection of the BRZ as its booked in at a crash collision centre to get the slam panel welded in and ensure everything else is straight. I'm waiting on an update from them this week. Once its done it will come straight back for me to start preparing it for paint.
Untitled by James Baker, on Flickr
I also purchased a used SARD style wing which I had delivered via courier. The clear coat has a bit of damage from a pigeon strike, however that will be repaired by my local bodyshop and the side brackets are in solid condition but needed a refresh so I removed the stickers, sanded them down and gave them a blast over with primer before they go full matt black. Once finished it will look like new for a fraction of the cost:
Untitled by James Baker, on Flickr
I also received another delivery from Subaru, this time the wheel arch liners, numerous clips, 1 of 2 washer jet covers (The other is on back order from Japan) and the headlight rubber seals (2 of the most expensive bits of rubber I will ever order, ridiculous but needed to bridge the gap between the headlights and the bumpers). I also purchased a used rear bumper as mine was damaged by the previous owner reversing it into something. It was damaged on the textured part which I didnt realise was moulded to the entire bumper, so decided theres no point painting a damaged bumper if I cant replace that textured bit at a later date, hence the new one. If anyone wants a cheap white rear bumper with a couple of marks on the textured part, give me a shout.
I have also joined the group buy run by Jordan for the HID setup for the Vland headlights to get some decent light output from them.
-
Tweedbean reacted to MartinT in MartinT's BRZ
Lack of use has taken its toll on my puny stock battery (48Ah Panasonic). It wouldn't crank the engine the other day so I charged it up and it started fine. However, a voltage check shows it to be just over 12V so it's knackered and there's no fully restoring it. I can't trust it for when I really need it.
I'm ordering a Yuasa 3000 60Ah replacement.
-
-
 Tweedbean got a reaction from spikyone in tweedbean's Porsche RS Green BRZ Build
Day 35
So its been a long wait for the slam panel, but its finally arrived from Japan. Subaru called today to say the parts are in but the local dealership was closed. They then offered an olive branch that they would deliver it FOC as they had a driver passing by house, so a contactless delivery happened this morning.
So excited as this was the final piece of the puzzle for the front end that I didn;t have alongside the little brackets/seals in the picture that also arrived. It means tonight I can start building the front bumper and bolting the brackets to the front wings etc.
Untitled by James Baker, on Flickr
I will also get the rest of the car stripped down ready for paint with all the mirrors, door cards, handles, seals etc to be removed. Will try and do removal videos for each items coming off the car to add to the "how to" content on my youtube channel. As mentioned the car will be getting a complete colour change so all door shuts etc need painting.
Once this is done I need to sort getting the car over to a friend to ensure it is all straight, he will also do all the welding to fit the new slam panel so we can test fit the lights, bumper etc to to help line up the front end before it goes over to the bodyshop which is 5 mins away from them. This is all dependent are who is still working or not through this as I know even getting the car there may be an issue as not sure what transports companies if any are still working and the car isn't in a position to be driven on the road.
So for now I will work on what I can get done at home to prep it all and see what responses I can get off the other links in the chain.
Also as I have gone for the USA spec front bumper bar cover with no number plate holes, I purchased a number plate holder that bolts to towing eye threads
Untitled by James Baker, on Flickr
Luckily I don't need any more body parts to go to paint, the genuine STI skirts, lip and rear bumper trim all come finished in black so no need to get them painted to match the car, decided to wait until all this blows over and order the genuine STI parts direct from Japan rather than go for rep parts.
-
Tweedbean reacted to likaito in Budget Build - Kai's Primo daily
Of course.
This is the ballast. Need to buy 2 obviously, one for each light: https://www.ebay.co.uk/itm/12v-35w-Conversion-kit-Slimline-Xenon-Hid-Slim-BALLAST/170823543539?pageci=311b7095-9934-4b03-89c5-96e05272f5c6
These are the bulbs. Just cheap ones because I wanted to test. Surprisingly good output, no worse than my old ones: https://www.ebay.co.uk/itm/New-2-x-D2H-Cnlight-XLX-Xenon-Bulb-Car-HID-Projector-Lens-Lamp-Bulbs-12V-35W/283484807138?pageci=518a566c-4ffd-47a1-8587-e4aeaa3972e6
Hope that helps 😊