

Stutopia
-
Content Count
300 -
Joined
-
Last visited
-
Days Won
6
Everything posted by Stutopia
-
The BRZ’s due new fluids, I’ve sourced them but need a few of the crush washers. Foolishly, as I drove past Toyota today I thought I’d nip in and get them sorted. Obviously this was an error by me. Why would Toyota have in any stock? Why would I be expecting to pay anything less than £22 for 5 washers? Anyway, after my laughter subsided I decided to do some googling. I mean I don't mid a little bit of stearlership mark-up but that takes the ****. According to the internet I need: Toyota Part Numbers 1x Diff fill plug gasket: SU00300122 - 24mm OD x 18mm ID x 2mm Crush (£1.32 ea) 1x Diff drain plug gasket: 1215710010 - 24mm OD x 18mm ID x 2mm Crush (£1.44 ea) 2x Gearbox fill/drain plug gasket: SU00303626 - 24mm OD x 18mm ID x 2mm Flat (£9.12 ea) 1x Engine sump plug gasket: SU00302159 Subaru Part Numbers 1x Diff Fill Gasket: 11126JB000 - 1x Diff Drain Gasket: 1215710010 - 2x Gearbox Gaskets: 17008AA050 - 1x Oil Drain Gasket: 803916010 Has anyone changed the fluids, are these "gaskets" made of something exotic and sourceable only from the moon or can I just use regular copper crush washers of the same size? Also anyone know the size of the one on the sump plug? I'm guessing its a 22mm OD x 16mm ID x 2mm due to the Mishi magnetic sump plug being M16. Thanks for your help.
-
Superb, thanks! I've ordered a variety of copper crush washers from eBay, so that's good. I think I've got a lifetime's supply for a touch less than £22 asking price of the Unobtanium Toyota ones.
-
Nice upgrades, I’d be really interested to see what these shave off your lap times, then how they stack up pound for pound versus other mods you’ve done in the time shaving stakes. If I was a betting man, I’d guess tyres > brakes > suspension > NA tuning maybe?
-

Black Friday Deals From Tuning Developments
Stutopia replied to Mike@TD.co.uk's topic in Tuning Developments
I’m just cutting up my credit card to stop me spending...- 31 replies
-
- 5
-

-

-
- tuning developments
- black friday
- (and 5 more)
-
Cheers for the product tips 👍 I’ve used CarPro’s waterspot remover ‘spotless’ in the past, I found it to be excellent for chemical cleaning, so that’s 2 for 2 for me.
-
I've pounded some motorway mileage in the last couple of weeks; this meant two things, one, she was ready for a wash and, two, I got a whopper of a stone chip. £25 excess later I had a marginally smaller looking stone chip and the windscreen guy even threw in some bonnet and roof swirls for free. Imagine my horror at wandering out to pay the man, only to see him wiping down the top 12 inches of the bonnet with a wad of paper towel. How you get glass cleaner so far from the glass will remain a mystery, I'm just glad he didn't give the whole car a wipe down. Now you might think I'm being a little bit fussy about the use of paper towels, but here is the before and after. So, yeah, thanks for that. Remember kids, if you do need to get someone out to work on your windscreen, supervise the bugger at all times. I did have a move of the full horror but, as you can see from the last two posts the youtube embed is not playing as nicely as it should. In better news, Wax and Shine generously included a few CarChem samples when I made a recent order. So today I had a play with CarChem's shampoo and glass sealant. This was technically my second go with the shampoo, I tried it a couple of weeks back at the recommend dilution of a couple of cap fulls in my wash big bucket and it wasn't quite as lush and soapy as I like, today I went crazy and used four capfuls for a big bucket and it was brilliant. Slick and lubey and bubbly. Some people on here will tell you science has proven that bubbles don't matter, but that's rubbish, bubble lives matter. The Car Chem glass sealant was an absolute doddle to use, after the recommended 7 minutes time sat on the glass it buffed off incredibly easily. Time, technically rain, will tell if the 7 minutes was long enough to cure in today's slightly chilly conditions. It buffed off with such ease, compared to other glass sealants I've used, that I really hope this is a winner in the hydrophobicity stakes. Last but not least, having a ceramic coating in place I decided to pick up a LSP that should hopefully bolster the protection, CarPro Reload - pretty expensive for a litre in my book, but it does seem to go a long way, so hopefully it will pay off in the long run. Nothing really struck me about this on first use, it went on and off easy and left a pleasing gloss. It appears to be streak free and leaves a nice slippy surface, we'll see what it does a dirt repellent as the weather deteriorates. At least one of the previous owners was a bit of a greasemonger, leaving me with a shiny outer steering wheel. You can see in the before image below the tide mark between nice matt leather and the grim shiny stuff. After two good goes at it with a horsehair brush and quite a quantity of Auto Glym Leather cleaner, it is looking better, but not as clean as I'd like. I don't get much of a boner about AG products, but I don't mind the leather cleaner or the engine degreaser. Hopefully another double blast next weekend might do the trick. If you've got any recommendations for getting leather back to good as new, please do let me know.
-
I wouldn't have begrudged them a fiver a month, but 400 bucks is a piss take.
-
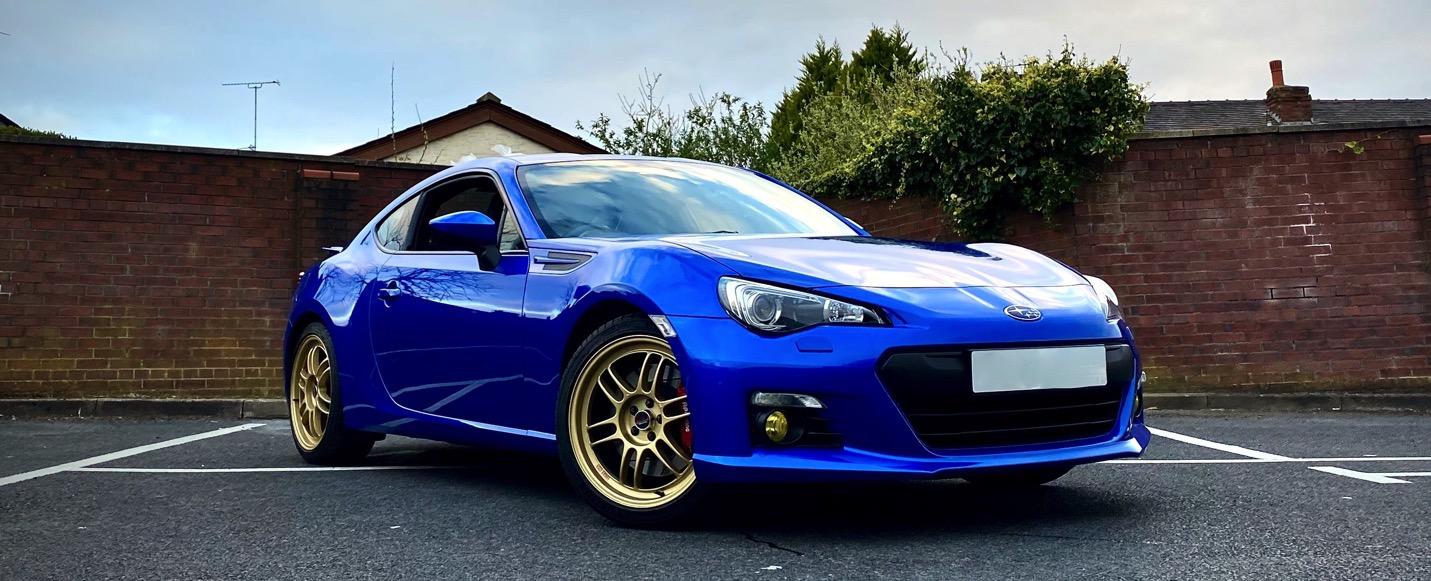
Love the blue. What’s the difference in mass between these and OEM?
-
It's good that people try unorthodox approaches, without it, there would be no reverse cowgirl
-
It was £38, which is expensive for what it is, but I paid similar for a NISMO one for the Zed. I can't honestly say it meant I went from not being able, to being able to (especially as I am very much still getting into it) but it just makes it 50% easier. For what it's worth, I recently learned that I heel and toe differently from some others. I tend to use the ball on the middle of the brake and then my heel just clips the bottom of the gas pedal (where the sticky out bit is in the pic) when I twist my foot, but others tend to put the left hand side of the foot on the brake pedal and roll the right hand side over on to the gas. I don't know if one is right and one is wrong, but if you're not feeling one style, try the other. It can be a bit tricky at first, so defo practice somewhere safe.
-
Although I had this on order a while ago, giving in to my powerful lust for modification, last weekend I did the CAT Cornering Masterclass and Colin suggested an extended accelerator pedal to assist my heel and toe, thus turning what was very nearly a frivolous mod into a necessary driving aid For anyone who hasn't fitted a Cusco pedal extender, I suggest you cut out the 10 minutes I wasted upside down in the footwell trying to fit this in situ and just whip the accelerator pedal assembly out - it's 2x 10mm and a cable clip. Simples. Not only does it look sexy and obviously is properly race car, it actually adds a bit to the pedal height (and obviously width) which means that not only is it easier for my right foot to reach, the dab of heel elicits a few more RPM than before, which is good because I was struggling a bit with the throttle response compared to my 350z. It's totally reversible when you sell up and, like a professional beating from an American cop, it leaves absolutely no marks.
-
Nah mate, I've kicked the habit, I'm choosing life
-
My monklike vow of non-modification suffered from a teeny tiny moment of weakness, involving a Beatrush Master Cylinder Brace. I sort of stumbled on these by accident when I was browsing the ever so pretty Cusco strut braces, and saw there's one with an incorporated MCB. I decided against the brace itself (the BRZ looks to be relatively well braced already and who wants to add unnecessary weight?), so I just went for the cheapest MCB I could find. Sadly they only sell these in orangey/yellow, which is a colour I'm trying to eliminate from the engine bay. So some primer, a splash of purple rattle can and some clearcoat later... et viola. Bumping up nicely, against the MC. I'd like to say this relatively simple looking mod was a doddle to pop in, but it was a total PITA. The bolt holes are way up behind the damper, totally inaccessible and a nightmare to get a spanner on. Then there's the nut side, where you're squeezed in up against a delicate looking computer box and constricted to about 12 degrees of spanner movement. After the faffing and swearing, it better bring a bit more to the party and than a nice splash of purple
-
Mine were cackhanded, built up quite a bit proud of the paint. The recent DA session reduced this and their visual impact.
-
Nice job, it's easy to jam paint in, but stopping them standing out a mile isn't.
-
An exciting opportunity presented itself for me to spend time at a local detailing company, Deadeye Detailing. The detailer in chief, John, would be spending some time showing me around DAs, pads, polishes, and also a glimpse into the world of nano-ceramic coatings. This post covers having a go at working on my car both familiar and new steps in doing a one stage correction. I should start off by saying I have enhanced some of the images in this thread in post, not to remove blemishes and defects but to increase contrast and definition to show the defects in my paint. One of the first things I’ve learnt is that it’s not as easy I thought to capture the look of paint and paint defects on camera!!! My own experience as a little DA use before, mainly correcting cloudy headlights, but only briefly on the soft paint of my previous 350z. Many people have advised me that you don’t need training to use a DA, do some reading and YouTubing, understand the process and then only the simplest of simpletons can do damage. However, I’m hoping for more than not doing damage, I’d like to start off with decent technique and achieve some gloss enhancement, perhaps even correction. The biggest obstacles for me thus far has been having to work on my own car, with no space for a scrap panel to practice on and having to do so outdoors. Which is always a mixture of too hot paint and all manner of dusty contaminants blowing onto the working area, that’ when it’s not raining. This was a chance to work indoors, out of the elements and with proper tools to help find the pesky defects. I started by tidying up my garage and arranging some of my stuff. This had absolutely no bearings on proceedings, but it felt like suitable pre-study Naturally the first order of the day at the workshop is a snow foaming. Good to see a familiar product from my shed, in the professional domain, Bilt Hamber Autofoam. One of the many perks I was going to enjoy in a professional environment is the tooling on hand, like a serious jet washer which makes petrol smells and super thick foam. Another familiar face, the Gyeon Q2M Silk Dryer is my current favourite drying towel. This absorbs water like nothing else I’ve used and is super soft on the paint. It’s a distinct step up from the excellent Woolly Mammoth I was using before, it’s just so soft. If I had one complaint, it’s difficult to wring out once it gets saturated, but that doesn’t matter if you’re doing a BRZ sized car and you’ve sheeted most of the water off first. More exciting tooling up next, possibly my favourite piece yet, a dog blower. This is a leap up in drying, even from the excellent Gyeon towel. No more water lurking in badges, handles or wing mirrors. I’d have one in a heartbeat, if they weren’t £750 a pop! I must find a budget alternative, eliminating touching the paint during the drying phase is surely worth it. Next up some new-to-me product Optimum No Rinse Wash & Shine (ONR). I don’t know what this product is meant to be, it has several claims, but it certainly does the job as a clay lube. Also new to me, Zaino Clay Bar, more like a putty or plasticine than the Meg’s and BH clays I’ve used previously, very nice to use, and soft. No horror shots of a filthy clay bar I’m afraid, my paint was more or less spotless. So that’s the easy bits out the way, time to try something new; a paint activated, three digit, random number generator. You pop it on the paint, wait a split second and it display a three-digit number, usually in the one hundreds. I Some say these numbers measure the depth of primer, paint and lacquer on the pane, I’ve no way of knowing about this black magic. Apparently, these numbers mean there is “plenty” As well as minimising the risk of my incompetence, part of the reason for the upcoming pad and polish combo is that my paint is in fairly good nick. This is it, post clay and naked, like Demi Moore in Ghost – ask you parents kids. As mentioned earlier, it’s quite difficult to pick up scratches on camera, particularly without the lights, which were in use on another car. Low on swirls but with quite a few random deep scratches, like this pesky bugger. After a thorough demonstration, I was handed a what was described as a safe (read idiot proof!) combination of products, so it was time to get cracking on my paint. The combo in question is a DAS-21 polisher, a yellow finishing pad and Scholl S40 polish, all primed for my beautiful WR Blue Mica paint. S40 bills itself as a gloss enhancing polish, free from fillers, so it is safe enough for a clown like me but also doesn’t flatter me too much by filling up the scratches instead of removing them. I have no frame of reference on this versus other products, it’s my first proper run, but I liked the enhanced gloss and reduction in scratches after the passes. The bonnet on the BRZ is nicely shaped for a noob and divides nicely into 4 sections. There are no significant creases and no furniture like washer jets to get in the way, a good place to start. I don’t have a 50/50 to show you as I was way too absorbed in what I was doing to bother with photos mid-way through, got a rather nice one after finishing the bonnet though. The gloss coming out very nicely if I do say so myself, quite pleasing for a first run. Unlike when I’ve done this previously on warmer paint with Menzerna Medium and Super cut polishes, the Scholl doesn’t dust, it can be worked for ages, and even after all these passes it was still quite oily. This was great for me as I have previously mistakenly used too much product, hoping it will keep it wet for longer, when really a sprtiz of cold water was needed – lesson learned. The process on these sections for me was two cross hatch passes at 5-6 with some pressure on the DA, then two more at 3-4, also with pressure, then two at 3 with only the weight of the polisher pressing down. Next up the roof and boot lid – all of the easy to reach and work on horizontal surfaces. A little roof reflection shot. Not perfect, but not many defects left. I did have the chance to go more aggressive, but for a car that never goes indoor, I elected to keep some of these and keep the paint for inevitable future corrections. The roof on the BRZ is a bit of pain to work on, it’s super flexible in the middle and prone to bending under pressure. Fortunately, the roof doesn’t attract much in the way of scratches, so there was less need for pressure on the machine. I quite liked the way it looked afterwards. Here’s a quick vid of the boot after the right half has been polished, left side naked. https://www.youtube.com/watch?v=JUd3M3GSYzk Once again I got to enjoy access to a bigger selection of tools than I have at home, namely the Vertool Mini DA a.k.a. “the 75”. This little thing is ace for a noob like me. It’s light, it doesn’t fight you and it simply refuses to bog down. It is used at lower speeds than the DAS-21 steps outlined above. The width is perfect for the boot spoiler, A pillars and roof sides on the BRZ. I can all of a sudden start to see why pros have so many different polishers, the versatility of size and throw is super useful. My Meg’s DA is a butter knife compared to this scalpel. Sorry for the brochure shot of the 75, I forgot to take a real pic. You can see how compact this little guy is compared to the DAS-21 – the only downside is the speed selector dial is located out of view when operating it. Tomorrow we get her up on the ramp and move on to the horizontal panels, then, with a bit of luck, onto nano-cermaic coatings. Oh and the small matter of dealing with this absolute bugger of a defect the PO skilfully buried under a mountain of glaze. If that image isn’t scary enough, check out the horror movie! https://www.youtube.com/watch?v=ViJtmvU-ooQ Last but not least, a bit of a secret project this one, so don’t tell anyone. I’m genetically engineering caterpillars which eat dirt and excrete gloss. Once we get the mutation just right, this will be huge. I might start a crowd fund P.S. if anyone sees a mutant 9ft, 300lb purple caterpillar which answers to the name Archibald, please let me know…
-
Opportunity To Detail With A Professional
Stutopia replied to Stutopia's topic in Cleaning & Detailing
Woah there poindexter, it's nothin' like a hoover, I mean the air goes outwards for one, and errrr, faster for two! That's completely different! 😂 -
Opportunity To Detail With A Professional
Stutopia replied to Stutopia's topic in Cleaning & Detailing
24 hrs, not bad... -
Opportunity To Detail With A Professional
Stutopia replied to Stutopia's topic in Cleaning & Detailing
Now that the coating has cured and it’s safe to do so, I’ve done some beads for the other detailing tragics like me. Due to the unseasonably warm weather these were created in a controlled environment, they not naturals. These beads are high and tight, just how I like to wear my afro! https://www.youtube.com/watch?v=uRXrSe9SbXY -
Opportunity To Detail With A Professional
Stutopia replied to Stutopia's topic in Cleaning & Detailing
So that’s the end of my time in the workshop and the paint shots under the lights. The rest of these are just outdoor glamour stuff for my own enjoyment, rather than properly lit up inspection photos. So what have I learnt this last few days then? When they say it's hard to do damage to the paint with a DA, they’re correct. But it's easy to do damage if I don't mask up properly – headlights! Work a small area until it’s just right, then get to it on the rest. Playing with the toys in a detailing shop is a quick route to an empty bank balance. I need a new DA, possibly two. A lamp. A blower. It's hard work working the paint by DA, you think it'll be easy after doing it by hand, and it sort of is, but they're heavy and want to get away from you and make a racket and make your arms ache. I eat too much fast food when work is tiring. It's addictive, I want to polish everything now. I think I like this more than my normal office job. Relax when polishing. Keep control and the pad flat, but don't tense up. Let the machine do the work. Use the force. Last but not least, obviously, it’s a huge treat for someone like me to get to spend time in a professional detailing environment, asking questions, chatting about products, watching and learning; even more so to get hands on the pro goodies and, most importantly, get some tuition. As with most skilled things, technique trumps tooling every time, so it’s been great to spend time learning before I’ve had the chance to pick up bad habits and without the need for me to blow the GDP of a small country on kit. I reckon I might even have a chance at taking out some swirls on some of the family cars now. Thank you to Mick (Chongo over on Detailing World) who dropped in and generously spent time showing me what to do and what not to, as well as what to look for under the lights, and telling me to relax. However, big thanks must to go to John at Deadeye Detailing for his time, patience and expertise. It’s been absolutely brilliant to see what you can do to transform the grimmest of paint, and to noticeably enhance paint that already looked in decent shape. Thank you. If you’re considering a detail and adding some protection, I’d definitely recommend you check out John’s previous work at http://deadeyedetailing.co.uk and give him a shout for a quote. -
Opportunity To Detail With A Professional
Stutopia replied to Stutopia's topic in Cleaning & Detailing
Having driven the BRZ home and back, Day 2 began with a snow foam and two bucket wash. I must say again that the BH Autofoam is even more impressive when fired out a heavy duty pressure washer, instead of the fast running foam I get at home from my Karcher, which drips off in 5-7 minutes, this produces a heavy, dense shaving cream. It holds it shape for quite a while before dripping away. Left to its own devices, out of the sun, I’m sure it would cling for 20 minutes! Just because I can, I fired up the Dezyna Dog Gizmo again. This is definitely my favourite pro-tool. Sadly John isn’t as impressed as me, pointing out that it moves the water around too much, instead of blasting it off the car. Whatever. I love chasing the water away with it! Up on the ramp I found this unpleasant surprise, no idea what has done it, but it must be me as it’s fresh and crud free – needs touching up pronto before rust takes hold L Being up in the air meant a rare opportunity for wheels off cleaning. I really dislike cleaning wheels at the best of time, particularly fiddly ones with narrow spokes, this means I don’t do it as much as I should. They got hit with Bilberry, both as a concentrated spray and shampoo. I’ve not really fallen for this product. It looks like it should be a fallout remover, with its deep reddish purple, but it isn’t. I’m not convinced by it as a shampoo either, I can’t see it dislodging my Envy Evolution and AMMO Plum for the time being. Another new, Red 7 fallout remover. It seems to do the trick, in that it smells like the inside of Mr Creosote’s jockstrap and turns iron to a purple streak, again I haven’t fallen in love and CarChem Revolt won’t be being dislodged from my shelf just yet. This is the Red 7 after brush agitation, but not much falling out, as I had washed them at the weekend, including a Revolt stage. This next item, I did fall in love with. My current AMMO woollies were superb on the 350z’s RAYS, but are just too damn thick to go through some of the narrow BRZ wheel spokes, but this little beauty gets into even the tightest of apertures, the EZ Detail Wheel Brush. I’ll be having one, no doubt. The wheels got a fairly familiar, to me, coating of Gtechniq C5 and as you’d expect from thier range, they look glossy, reduce water/drit adhesion and should last 3-6 months. This is the first time I’ve bothered to coat wheels, rather than wax, so I’m hopeful it’s up to the job, because (did I mention it already?) I really hate cleaning and sealing wheels. Like. Really. A LOT. With the car up in the air for wing and door inspection under the lights, it became clear that they had seen a bit more action than the bonnet, roof and boot. Accordingly, Scholl S20 Black[/url] was broken out. Apparently a true one stage polish, which reduces down from a cutting compound to a finishing one, just through the working on the panel. All thanks to the diminishing abrasives. As with any product which purports to do many jobs, it can sound a bit too good to be true to me. But, I must say that on a yellow pad, it shifted the majority of my scratches and left a stunning finish, so that just shows what I know. Polished Bliss goes so far as to use the phrase, “Holy Grail of polishes”. Looking at these pics, I can see why they’re so effusive. These first few pics don’t appear to show much, but it’s harder to photograph scratches than I expected, and wider shots with bigger reflections tend to hide, rather than reveal. So I’ve included these to try and show how super the finish is. Slightly wider. Up in the air is truly the way to work on the side of your car. Instead of tending to rush a job to save either my back or knees, all of a sudden you can take your time and get eyeball to eyeball with the paint. Now, I have to tell the truth here. I’d like to say that the wings and doors were expertly corrected by my fair hand, but John did the work here and I studied and took pictures. Remember the monster defect above? Well this is what was left of it after a few passes with S20 Black by a professional. Still visible under the lights, but incredibly hard to find outdoors https://www.youtube.com/watch?v=ZlrBQUDDAQY Not a bad finish eh? Another great tool, the Scangrip Sunmatchinspection lamp is so much better than the LED torch I use to try and find swirls. The light is super sharp and is a must for finding defects and checking work. Naturally I quickly decided I needed one in my life, until I found out that they’re the best part of two hundred sheets. I learnt quickly in my time in the workshop, and it’s well worth remembering if you go to a professional detailer for a quote, EVERYTHING in detailing is expensive. I daren’t even look at the price of the floorstanding lights. On to the final stage, this is where it gets interesting (well for me anyway, perhaps for you, if you’re still reading!). I’m a natural sceptic, accordingly any kind of superduper sealant/coating/wax/spray/magic dust which claims to be an all in one glossifier, anti-stone chip, anti-etching, super strong but flexible mega product which lasts for 100 years - always seems a bit far fetched. However, the boss advised me that the [url= http://www.ceramic-pro.com/en/]Ceramic Pro[/url] range was so good that not only did he literally wet his pants when he first saw it, but he became a fully paid up fan boy. I was further swayed when another pro detailer dropped in during the week and told me tales of being a converted sceptic who was won over by the product upon use. This was enough to convince me that having a chance to have it on the BRZ was not an opportunity to be passed up – especially as it’s about £219 for 50ml for the 9H :scare: So here it is. Much like myself, it’s not very tall but the magic juice inside makes the difference It’s unforgiving to the untrained, so I was placed on long pile buffing duty for this, well away from the product, which was applied by a trained professional. It needs to be worked relatively quickly but isn’t a huge departure from the Gyeon and Gtechniq sealants I’ve applied in the past. In a nutshell, don’t use too much, spread evenly and precisely, wipe away promptly with one towel, look for high spots and buff again with another towel (my job). After only a few minutes it leaves a very pleasing level of gloss, I’m sure you’ll agree. Once complete, the coating needs a minimum of 8 hrs out of the elements, so she spent the night in the workshop. I returned this morning to pick her up and have a feel of her wares. Ooooh and indeed errrr. Well, what can I say? The slickness is phenomenal. You know what paint feels like when it’s been clayed to perfection, and it’s glossy and glass like? Well it’s beyond that. It’s super, super slippy. It’s so super slippy I’m sure that as well as feeling immense, the car actually goes faster. Slipping through the air as it struggles to get a grip on the panels. I’m going to keep an eye on my MPG, as I’m convinced the reduced drag will mean an extra 5mpg I may be a little over excited, possibly the drag coefficient has been affected, but I must admit that having been a bit of ceramic coating sceptic, I’ve certainly been won round on the look and feel front. In terms of its ability to repel dirt (mainly bird s**t around here – more on that later) and traffic grime, only my first wash after some motorway miles and standing in the elements will tell. The same can be said of longevity, I’ll be keeping a close eye on her for the next 6 months at least. The marketing describes it as “permanent” but I’ve not drank so much of the koolaid that I’m willing to buy in, just yet! -
I've been using this quite a lot this week to protect leather, post cleanse with Dr Leather http://www.cleanyourcar.co.uk/interior/leather-care/gtechniq-l1-ab-anti-bacterial-leather-guard/prod_1093.html It's easy to work with and leaves a pleasant finish. It's the first time I've used it though, so can't comment on longevity yet.
-
That's a great little run. Cool pics too.
-
If you can't afford to put it right out of your own pocket, should the worst happen, consider track insurance. Some will say it's a waste of money or for soft lads, but for not much more than £100 the piece of mind may help you relax and enjoy the day more. Enjoy!
